Total Pageviews

Saturday, 23 July 2016

"Happy (Gluten Free!) First Birthday To Me!!"


Happy Birthday to me!!  Wow!  It's been one whole year since I was diagnosed with Coeliac Disease!  And what a shock it was to be given that news.  It's been a wild ride so far, and I have learned so much in that one year. Anyway, here I another Christmas card I made.  I used the SU Banner dies to make the reindeer, and used the antlers from 2 smaller reindeer dies for the antlers. These are so much fun to make, and each one makes me smile:-)  I like "happy" cards!
That's is all for today, I am off to celebrate my "Birthday" with a cup of tea ad a gluten free muffin!  Thanks for dropping by, {HUGS} from me to YOU:-)


Friday, 22 July 2016

Fun With Post-It Note Pads and a Card!

I made another post-it note thing today, and I used a die from Poppy Stamps, called "Patient Pup", style 1208.  Isn't he cute?! 
And above, is a close-up of him.  So much fun to make!
This is another Christmas card I made this morning - so much fun!  I used my Banner dies from SU for the reindeer, and then die cut just the antlers from another reindeer die, to use on Rudolphs head!  I randomly stamped some snowflakes and put some tiny red/diamond gems in the centers of each snowflake.  His nose is a circle of red felt, and his mouth was made using a small hole punch, punching out a small black dot.  I drew the white lines around Rudolph with my white gel pen.  I layered the white cad onto some Christmas paper, then layered that onto the red card. Two small wobbly eyes and he was finished!  I had lot's of fun with these two pieces.  Thanks for dropping by, {HUGS} from me to YOU:-)

Monday, 18 July 2016

Fun With Post-It Note Pads!

I made these post-it note holders over the weekend.  I covered two thick pieces of card with some colourful scrap book paper.  I used double sided tape to stick it to the card.  Then I attached the post-it note pad and added the cats and tiny flowers.  (The flowers are from Flowersome Crafts NZ).
I was almost finished this one, above, when I became very unwell and ended up in hospital for the afternoon:-(  Once I had been thoroughly checked by the Doctor, and my medication was sorted, I was discharged.  It was all to do with my sinuses being infected and my balance was not good.  So much so I couldn't even sit in a chair without falling over:-(  So it was a slow weekend craft wise as I had to take medication that made me sleepy after taking it.  Not good if you want to do some craft work!  I am feeling better today (Monday) but my balance is still not back to normal.  But I was able to get these post-it note things finished today:-)
I used two of my cat dies, and some sticky net tape stuff that I got from the $2 Shop.  I used my SU flower dies on the first one, to make the flower, and a flourish die (Not from SU) underneath the flower.  These were lot's of fun to make and would be ideal gifts for ANYONE!  I intend to make some to sell once I get some more post-it note pads.  Ok that's me for today!  Thanks for dropping by, {HUGS} from me to YOU:-)

Friday, 8 July 2016

"Crazy Cats" Card # 3

Here's another "Crazy Cat" card I made today.  (Tim Holtz stamps) This one has spotted a Lady-bug!  The colours have photographed better on this card, no idea why!  I sponged the cat and also used water colour paints.  I didn't have any appropriate word stamps that fit the front of the card but might stamp something inside the card.  The Lady-bug is an Elizabeth Craft die.
Thanks for dropping by, {HUGS} from me to YOU:-)

"Crazy Cats" Card # 2

Here's my 2nd "Crazy Cats" card!  More spilled milk, tut tut, what will Mom say?! These cats are either very clumsy, or just plain naughty!  For some reason, lately, I am having trouble with the colour when I post photos on here:-(  IRL this card is much brighter and more colourful than it shows on here.  Maybe it is because it is Winter and so the light is not as good?!  It is driving me NUTS!
I made the spilled milk by mixing shaving cream and white glue together.  I just kind of "paint" it on where I want it.  It does take some time to dry though, (I left it to dry over night) because it is Winter.
I HATE that 'Winter' word:-(  I have also cut the milk bottle to make it look like it has smashed.  Naughty kitty!
Ok, thanks for dropping by, enjoy your day! {HUGS} from me to YOU:-)

Thursday, 7 July 2016

"Crazy Cats Card #1"

Here's the first "Crazy Cats" card I have made so far!  Ooops!  He's spilled the milk...
I used a new stencil for the background bit with the criss -cross pattern, and sponged it with green and brown ink.  The word stamp is an old one I have had for many years.  No idea where I got it from, but isn't it fun?!  I cut the milk bottle in a jagged fashion and drew with black ink around the jagged bits. You can see (below) what the milk bottle looks like before I cut it. I lightly sponged some brown in to make it look like Chocolate milk puss has spilled!  I added some Glossy Accents to the spilled milk, but it's not showing in this photo.  His eyes also have some GA on.  I sponged puss in some different colored inks to give him multi colours.  SO much fun making these Crazy Cat cards!:-)  I am making a card using each cat from the set, so eventually there will be six different cards.
The weather here today has been very dull and cloudy, with rain this afternoon.  And it is COLD:-(  Winter is not my favourite time of year and I suffer badly from poor circulation. So I am constantly trying to keep myself warm!  The house I live in is not good for my health, with mold on all the ceilings, and it is icy old and damp, but, for now, I am stuck here.  Looong story!  
Ok, thanks for dropping by, {HUGS} from me to YOU:-)

Monday, 4 July 2016

New Dies and Stamps

The stamp set above, is called "Crazy Cats" and they are Tim Holtz stamps. The die set, below, are the matching dies for the stamps. I fell in love with them!  So cute and funny! As soon as I make something with them I will post it here!
The blue card with flowers, below, is made using a new die from a Tim Holtz (Sizzix) die set.  There are four dies in the set.  The flowers are from Stampin' Up!s Botanical Builder die set.  The tiny flowers are from "Flowersome Crafts NZ."
And this is the die set, below.  (The number is 660220)


The two photo's above are the shapes each of the dies cut out.
This pink card has a die I used from a Memory Box die set called "Distressed Baptista Collage".  It's a set I have had my eye on for awhile. (SU flowers, plus flowers from "Flowersome Crafts NZ) Below is a photo of the four dies in the set.
And the 2 photo's below are of how each die cuts out.  These dies are SO much fun!  You an place the die anywhere on your card, and at any angle you like.

Thanks for dropping by, {HUGS} from me to YOU:-)

Sunday, 3 July 2016

"Jack Lives Here"

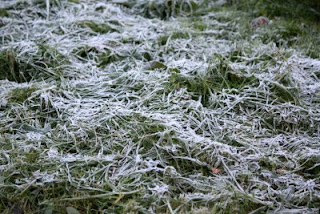
No!  Not Jack Daniels - Jack Frost!!  These two photo's were taken early Saturday morning.  My back lawn was covered in white frost!  It was  -0 overnight and COLD:-(


I made this cat card using a die from Marianne Collectables, and it comes with a set of five word stamps.   
I'm going to show you how I adhered it to the card without using glue, glue dots,  or sticky tape!  First of all I cut a piece of black card a bit bigger than the actual die. 
Then I adhered a piece of Jac paper (double sided clear sticky paper,  Scor Tape woks the same way) to one side of the black card.  This is what it looks like, below.  Leave the other piece of backing paper on the Jac paper for now.
Place your die, cutting side up, on your die cutting mat and place the black card with Jac paper on, on top of the die, Jac paper side up, as shown in the above photo, and run it through your die cutting machine.  I run mine through a couple of times to make sure it had cut cleanly.

 The photo above is what it will look like now.  Carefully remove the unwanted black card and this is what you get, below.
Carefully remove the black card cats from the die and you get this, below.
This is what the die cut cats look like with the backing paper still on, once you remove it from the die.
Carefully remove the backing paper from the die cut cats and you now have a sticky pair of cats ready to adhere to a card, as seen below!  No glue, no glue dots no sticky tape, NO MESS!! This idea works great with intricate dies with little delicate fiddly pieces. (But you can use it on ANY die!) Using glue on tiny delicate pieces of card is a challenge and can be messy, with disastrous results.  THIS way, with the Jac paper, or Scor Tape, it will work every time, and is clean and neat, no un-wanted sticky bits of glue on your card in the WRONG place,  that you now have to put an  embellishment on that you really don't want!  I hope you try this idea and let me know how it worked for you!

And we had another frost here this morning! We don' often have frosts back to back, but the temps have been very low over night lately.  Gorjuss sunshiney days with no clouds, but oh-so-cold at night:-(  So yes, Jack lives here...

Thanks for visiting, hope you enjoyed your visit and come back soon!  {HUGS} from me to YOU:-)