Total Pageviews

Monday 25 April 2016

Stamp Room Tidy Up And More!


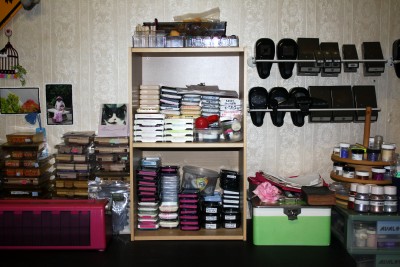
The three photo's above is of my stamp room before I tidied up yesterday!  Things were everywhere and nowhere!  The only things in the right place was my punches on the wall!  I didn't have much desk space to actually stamp or create, so I decided to clear stuff way and put it in it's right place!
The set of white drawers above also have stamps in them.  I had the drawers made specially for my stamps, about 10 years ago. The guy that made them said he had never made stamp drawers before, and he was keen to get them done to see how they turned out! Each drawer has slider things on  so they are easy to open and shut.
Above is my old method of storing my stamp pads = messy!  And I could never find the right stamp pad!  Below is my new storage for my stamp pads!  I need to write the colour on some of the pads.  It isn't exactly perfect but it works for me.  For now!  Until I find something better!
These photo's below are the room once I had tidied things up.  It is a work in progress!  
All my craft stuff is my living room; it's a large open space room and I can use as much space as I need/want!  What i do need is some storage for under the tables.  At the moment things are just kind of stacked under there in no order.  My cats love to "explore" under there! 
These are two flowers I made (below) using water to scrunch the flowers.  This was some lumpy-bumpy card I had and had never used. It had great texture to it.  The weird thing was, it went really slimy once I spritzed it with water!!  It was slippery and felt slimy:-(  But it made great flowers when it dried!  To dry them I have a small ceramic bowl, and an egg cup, that I put the flowers in so they kept their shape.  I used my hair dryer on a low setting to mostly dry them, then left them in the sun to completely dry. Lot's of fun:-)
Below is "Bella-Rosa" (AKA "Lula-Belle Irene"!) trying out her new "toy"!  It's a bunch of toilet roll tubes with cat biscuits in! I put the tubes into a smallish box and then put some cat biscuits in each roll.  She knew right away how to get the biscuits out, and had them scoffed up in a minute!  

 And this cute bloke is "Romeo-Valentino" all tucked up in a blanket!  It was quite a cold day, and he just loves snuggling into a soft woolly blanket!  The blanket is one of those weird colours (pale lavender) that just doesn't photograph well.  It's a much brighter colour than it shows here.

This is one of my neighbours trees which is at the back of my place.  Every Autumn it changes colour and eventually loses all it's leaves.  I see it every day from my kitchen, and it is so pretty.  This is the top of the tree, and it changes colour from the top to the bottom.  So pretty:-) 
 Thanks for dropping in, I hope you left with a smile, and come back soon!
{HUGS} from me to YOU:-)

Saturday 23 April 2016

A Floral Thank You Card

I  used my SU Botanical Builder dies for the flower, and cut it out of some black glitter card.  For the center of the flower I used hot pink card.  I lastly added a sparkly gem for the center of the flower.  I seriously love this stamp and die set!
The words are also from an SU stamp set.
The leaves are from..??! Now I know "??!" is not a company, but I can't remember who they are from!  Ok, that's it for now, thank you for visiting and I hope you left with a smile!  {HUGS} from me to YOU:-

Envelope Punch Board Box

I made this box using a piece of Stampin' Up! card cut at 81/4 x 81/4 inch square. The top photo is the finished box without a handle. The paper flower is one I made recently.  I added some leaves, and a strip of DSP across the card.  I also added some pearls.
The photo above shows the box with a handle.  It is attached to the box with two brads, so the handle can be moved so you can open/close the box easily.  The photo below shows the back of the box with the flap.  I left a space under the DSP (I did not put any glue or tape here) so the flap tucks under the DSP to hold the box closed.
I got the the idea for this box from here, from Megs blog.  Thank you Meg, love it!  Please hop across to her blog, she has some great cards etc!  The finished size of the box is about 5 1/2 x 4 x 1 inches.
These are easy to make, and quick.  I am sure I will be making more in the future!  Let me now if you make one and I will pop over to your blog to see!
Thanks for visiting, hope you left with a smile:-)
{HUGS} from me to YOU:-)

Thursday 21 April 2016

Flowers, Photo Frame, Bookmark, and other Bits!

The lavender flower above, and the pink flower below are both made of card.  I found some instructions on the interweb and made these two!  You spritz them with water and scrunch them up.  When they dry they are hard!  I will be making some more in the future.  I just wanted to see how they turned out - I like them!  I used a set of flower dies for both flowers.  Lot's of fun:-)
 
The lavender flowers below are REAL!  I think it is related to the Sinningia family.  Not sure of the spelling!  The flowers are so delicate and pretty.

The photo below is of the entire plant.  It hangs down and grows very quickly.  In fact, each leaf will grow if it falls into the pot plant!  This is one of my favourite plants. You may be asking, "What is the stack of egg cartons doing in the background?!"  I know I am!  I was so focused on taking the photo I forgot to remove them first!  I keep them for my two cats, "Bella-Rosa" and "Romeo-Valentino" to scratch on!  I accidentally discovered them both scratching on an empty carton one day, so I figured I would keep them for future use for the cats! Cheap entertainment and saves them scratching on any furniture!


 Below is a small photo frame I made.  I have to find a photo small enough to go inside!
I've used the SU Botanical Builder dies, and sponged Blackberry Bliss ink in the center of each flower.  LOVE that colour ink! 
OMG this is SO out of focus  (above!) :-(  Apologies!
 On the small flower, above, I cut the tiny leaves from some craft foam to add a different dimension.  You probably can't tell by this photo.
And this is a bookmark I made!  I used a piece of ribbon, some gold elastic and a tea pot shaped button.  I took five minutes to make:-)   For those curious to know..the book is a Rod McKuen book!
These bookmarks would make great presents!  And I have plenty of fancy shaped buttons... 
Now for some good news!  A few posts back I showed you my "We R Memory Keepers" Envelope Punch Board that  sprung apart when I was using it.  You may remember I mentioned I had sent an email to WRMK asking them if it was possible to fix it.  You may also remember that I mentioned that WRMK did not bother to reply, which I may have mentioned left me feeling a bit cranky at their (what I felt was) total lack of respect for a customer. Well, some good news!  I took the WRMKEPB back to the shop I had bought it from, and they replaced it free of charge!!  So A big thank you to WAREHOUSE STATIONARY in New Lynn!!  You guys rock!  Even though I had purchased it over a year ago and had no receipt for it, you replaced it.  Thank you!!
Okay, the photo below is of my new guillotine I got a couple of weeks ago.  I posted on here that the one I had, had a crooked grid and I was not able to cut perfect straight edges:-(    Bummer:-(
I found this one (Brand new) on trademe.co.nz for $17 which included $6 postage.  It is 12x10 inches and is fabulous!  I can now cut things straight!  Yay!  This was bought from a company called crazy.deals. Check them out if you want a really great guillotine...and straight edges for your cards!


Okay, that's me for now!  Thank you for visiting, I hope you left here with a smile...come back soon!  {HUGS} from me to YOU:-)

Saturday 16 April 2016

How To Attach Vellum To Your Cards

While talking to my stamping buddy, Margaret, on the phone ten minutes ago, I came up with a great way to attache Vellum to my cards without using any embellishments, brads or other dooh daahs to cover up the glue/sticky tape holding the Vellum!  What did I use??!
I used double sided Jac paper, and it worked perfectly!!  The Jac paper is light and totally clear, and you cannot tell it is under the Vellum!  Woohoo!  I have just solved something that has had me challenged for years!  I cute the vellum (the gold swirls) and jac paper slightly bigger than the white base card, and trimmed the edges once I had the vellum and Jac paper stuck on the card. If you try this idea, let me know how it worked for you!
Ok, it is waaay past my lunchtime so I am off to feed my face, now that I have fed my brain!
Here is the finished card.  I lastly added two corners to the card.  I can assure you, there is NO hidden tape/glue anywhere on the card!

Thanks for dropping by, {HUGS} from me to YOU:-)


A "Blooming" Good Morning!

I made this card this morning after seeing a similar card on Pinterest.  I used my SU Botanical Builder dies for the flowers and the fern.  The DSP is also from SU and I stamped the coffee cup ring in pale blue ink onto the DSP.  I also stamped a small flourish stamp on the DSP.
You can see the coffee cup ring better in the photo below.  It is quite subtle, but there! 
I love making the flowers, as the dies are so versatile you can make them in so many different ways!
The bottom photo is a close up of the words I stamped on the side of the card.  I wanted small words that wouldn't detract from the flowers, which I perceive to be the main focal point.
 Below are some tiny treat bags (store bought @ $3 for 6 bags - I don't yet have a treat bag die but watch this space..) I embellished with some die cut flowers.
You may have noticed the one with the  mustard coloured flower is a bit shorter than the others?! That's because I miss-calculated when I die cut the half circle!  Oops:-(  You really have to concentrate on the job at hand and not be distracted by your cats who were both busy climbing the drapes to get a moth!! This lesson I learnt quickly!
The photo   above shows the tiny Banner die I have used, on top of the strip of flowery DSP that goes cross the bag.  

I made a small card to go inside each treat bag and stamped tiny flowers and leaves on each card.  These were so much fun to make!
I will let you in on a secret, but you have to promise not to tell anyone...I actually made these while I was in BED watching a movie on TV one night!!  I had all the bits die cut and ready to assemble, so that's what I did! The nights are getting colder here, now that we are into Autumn, and making cards after the sun goes down is not fun anymore!  
And if you hear me complain because there are random sticky dots in the bed...remind me of how they come to get there!!
Thanks for dropping by, {HUGS} from me to YOU:-)

Monday 11 April 2016

My Creativity "Blooms" Again!

The floral card above was made using  SU Botanical Builder Dies. I love those dies! 
I brayered a white card with multi coloured inks, then on another piece of white card I die cut the lattice.  I then glued this to the card I had brayered with multi colours.  I glued in a few of the lattice pieces in a random fashion.
 I added some flowers in various colours and lightly inked the petals.  I die cut the butterflies and the bee, andadded some small gem stones on each flower.  Lastly I cut the banner and stamped the sentiment n black ink.
This card has taken me sometime to finish due to being in an out of hospital so often lately.  I just did a bit here and a bit there, and finally got it finished over the weekend!  Yay!
The only slightly irritating thing is, the card is much brighter IRL! :-(
The "Get Well" card below didn't turn out how I imagined it:-(  It's a bit "dull", but I am not sure what it needs!
I tore a piece of blue and white DSP in half and then cut a slice off one side, so it would fit on the card.  I stamped the band aids on various coloured DSP and glued them to the card.  I added the red hearts last.  While it is "ok", I am not entirely happy with it:-( Oh well.. 
 This is a tube I made using SU DSP.  I die cut the flower using the SU Botanical Builder Dies.  Quick and easy..and fun!  You can put a small bar of chocolate inside, or anything else that would fit.  Great for a quick and easy gift!
I love making these flowers, they are so pretty, in ANY colour! 
Okay, that's me for today, thank you for visiting, {HUGS} from me to YOU:-)