Total Pageviews

Sunday 30 June 2024

I made Some Miniature Clip Boards and a Card!

I made these miniature clip boards from some Formica samples. The smaller one measures about 2  1/2 inches by just over 1 1/2 inches. I got them from a place called West Auckland Resource Center, which is close by.  It's a place where you can either drop off surplus items you would otherwise throw away, as long as they are good quality. You can also go there and purchase a banana box full of whatever you like for $10. Our banana boxes are quite large and you can get A LOT of stuff in them! Or if you only want a few things, half a banana box, you pay $5. They have all  kinds of things, from paper and cardstock, to material and out date and unsold calendars (which I make envelopes with), to everything in between. Obviously stock changes every week, so if you see something you want, you get it because it may not be there when you come back again. So I grabbed a pile of these Formica samples and made these miniature Clip Boards! You can see the size in the photo below. There were two sizes so I just grabbed a handful of each size. I also donated some old art stuff I no longer use. The WARC was started because one of the staff lived by a local tip, and was horrified at seeing how much good quality products were being thrown out by various companies. She was a teacher at a local Pay Center and thought what a waste it was, when most of the products could be used by crafters. The volunteers that work at the WARC get a small grant to help cover costs such as their time, plus power etc, but otherwise it runs on donations of people like me who go there and buy stuff. The more people that go and buy from there, the better. Anyway, I have been there twice and some of the things I got in my banana box were, blank paper, formica samples, calendars, material, mini note pads (from a Real Estate place), ceramic tiles (that I have stamped on which I will show you in another post) envelopes, pieces of lace, bottles of brand new white art glue, glass tiles (I am going to get a glass pen to write positive words on) band new scissors...the list goes on. As I said, here is a ton of stuff there and you need to look carefully or you might miss something good! Oh and I also found a couple of 4 x4 inch 'things' that have some kind of thick fuzzy material on top, that I can clean my stamps on! I have no idea what they are for, but I clean and dry my stamps on them! So you really do need to take your time ad rummage to see what you can find. And to think, before the Resource Center was around, all of these things would end up in the tip. What an incredible waste, and how selfish not to re-distribute it to places like this Center for people who can use the stuff. Businesses need to stop throwing out good quality stuff, and offer it to others. Ok I'll get off my hobby horse now and get on with my post!
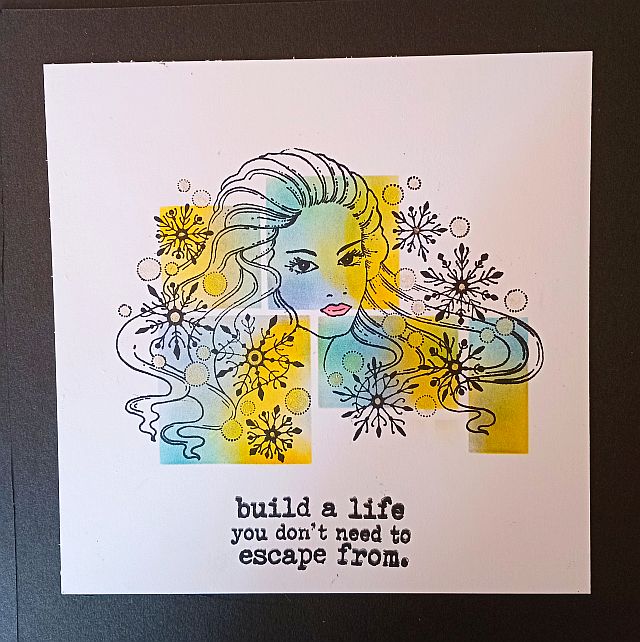
Ir made another cad this morning, using the same Abstract Squares Clarity Stencil that I used on my other post yesterday, in the post before this. For this card, below I used a Chocolate Baroque stamp, "Winter Dawn". Because the background is coloured, the only parts I coloured on the stamp, are her lips, and the little balls have clear sparkly gel pen on them. Of course, you cannot see that on this photo! The card measures 6x6 inches square. I matted it on to some black cardstock. I'm enjoying this style of card at the moment.
Thanks for dropping by! Have a SUNSHINE day! Remember to always be your authentic self and shine bright each and every day!
 

Saturday 29 June 2024

Two New Cards!

I used an old Stampin' Up! stamp and die set to create the top card. If it looks buckled, that's because it is! It was leaning on my Doona and wasn't very well supported. Oopsie! It's quite a quick cad, pretty basic, and fun! I'm going to add some tiny stars, or some Posca pen splatters.
I made the card below using a 7x7 inch Clarity Stencil. I can't find a name on it, sorry. I used some low tack tape to mask off some of the open squares on it, leaving only the ones I wanted to colour, open. I used a pink, blue and yellow Versafine Clair ink pads, some of the new ones, to brush on some colour to each open square. I've just realized, I ought to have taken a photo of the stencil so you can see what I am talking about! Another oopsie!  I will take a photo o the stencil and add it to this post, later. For the Bees I used 2 Visible Image stamps, and the words are from another Visible Image stamp set.

I've had the stencil for awhile, and this is the fits time I have used it. I watched a video by Eileen Godwin in which she used this same stencil, and she showed how to mask off the open squares you don't want to colour. So I made this card after watching the video. I really like the style- simply and stylish. Well that's my not-so- humble opinion! Okay, so I have added the stencil I used for the card above. First pic shows how I masked the squares I didn't want to colour. As I said, I used low tack masking tape.
Below is the back side of the stencil, it shows what the stencil looks like before I masked some of the squares - sort of! What I mean is, you can seethe stencil better. I left the making tape on the stencil, then placed a piece of grease proof lunch wrap behind where the making tape is so the tape doesn't stick to anything but the grease proof paper. The making tape comes off the GPP paper easily without tearing. When I want to use the stencil again, I can move the tape to cover the squares I want to mask. Gee, I hope I have explained all this ok?! So basically, in the photo below, the black squares were the ones that were coloured on the Bee card above.

I went out this morning and when I came home, I noticed a neighbour cutting big branches off my Camelia tree. I don;t mind him cutting what's on HIS side of the fence, but these big branches had been cut about two feet into my property. He saw me watching him, and quickly disappeared. I was furious. This is the fourth time various neighbours (I have 6 neighbours) have cute trees down on my property without permission. Last time was in May this year, and one of the trees on MY side of the fence, on MY property had been cut off down at ground level. Originally that tree was about 30 feet high. Another time, some years ago, a neighbour actually cut my trees on MY property down to about 10 feet tall. They were twice the height before she cut them. It was done when I was out one day. There was a court case over it because I put in a complaint with the local Police. He came and checked and said it had more than likely been a certain neighbour, because it was highly unlikely that a stranger had walked in with a chainsaw, and walked down the back of my property and chopped them down. He went to speak to this certain neighbour, whose wife admitted she had done it because the trees made too much shaded on their deck. Their house wasn't even there when I planted the tree's, it was built some years later, after the tree's were well established. So because she (the wife) had admitted she had done it, there was going to be a prima facie court case. Prima facie means because the wife had admitted to cutting the trees, I di not have to appear in court. However, the court case was a few months away, and in the meantime, the neighbours threatened to kill me if I went ahead with the court case.
So, because I knew what these neighbours were capable of (long story) I cancelled the court case, so thy got away with it. It didn't end there, I had no end of trouble with those neighbours. I spent over $100 and planted another ten trees down the side of my fence. At that time, I had a vege garden down there ad every time I was in the garden, those neighbours would stand there staring at me until I went back inside. I thought if I plant the trees there it would stop them from staring at me. So the ten new trees I planted were about 8 feet tall when I planted them.
I got up one morning after the trees had been there about 6 weeks, and noticed a weird brown ring in the grass around the trees. On closer inspection, I discovered they had been poisoned! You guessed it, those neighbour's had poured chemicals around an on the tree's, and within a short time, the tree's died. Thankfully those neighbour's moved out several years ago. Myself and 3 other neighour's all celebrated the day they left! So yeah,I was not happy when I got home today to discover my Camelia tree being cut. Anyway, I hope you enjoy my cards for today! It's freezing here today so I have just put the heat pump on to warm up, then I am going to make a card! Thanks to those who read  all of this! Thanks for dropping by, have a SUNSHINE day! Remember to always be your authentic self and shine bright each and every day!


Tuesday 25 June 2024

Gone Fishin'!

I made the card above using Stampin' Up! A Fish and a Wish stamps and punch. I'm not 'a little ray of Sunshine' today as I have either another cold, or it's allergies. It's hard to tell, but I keep sneezing, have a runny/blocked nose and watery eyes. I'm not keen on the fish card but I wanted to make something.  Poor Romeo has also been sneezing a little. I think his is allergies. It's not easy for me to get him to and from the Vet as I have to get there by taxi and they are not always reliable because they don't always arrive on time. He's heavy and I have a hard time lifting him in his carry cage. He's not too bad, so I'll see how he is tomorrow and make a decision then.
No you are not seeing double! You are correct, you have seen this card (above) in a previous post! However, I have added some sparkly sequins to three of the corners. I post all my LS cards on LS face book pages, and can ONLY use LS products on my cards. The sequins are not from LS. I think the card looks better with the sequins on. So this is why I have added it here! Thanks for dropping by, have a SUNSHINE day! Remember to always be your authentic self and shine bright each and every day! 

Saturday 22 June 2024


I followed a demo by Emma-Jo from Lavinia Stamps to make this. I used white gesso on this MDF Heart from Lavinia Stamps. Then when it was dry,  I used a stencil brush to add the Mermaid and Blue Lagoon Elements ink to cover the entire heart. I used my heat gun to dry each layer of ink, then I stamped the group of fishes onto the heart. The fish have tiny touches of purple foil on them, which you can barely see on here. Once I had done that I added some swirly lines of Lime Green Stickles. I'm not too keen on this, but I made it so here it is! It does look a lot better in real life, and when it catches the light there's lots of sparkle. I will add a piece of twine so it can be hung up somewhere. Thanks for dropping by! Have a SUNHINE day! Remember to always be your authentic self and shine bright each and every day!

Friday 21 June 2024

Lavinia Stamps "Astrid"!

 This is "Astrid", she is quite a large stamps, so I used my stamp platform to make sure I got a good impression of her without any 'missing' bits.
I stamped her in Nocturne ink - I use this ink 99% of the time - and then used my Kuretake water colour Real Brush markers to colour her hair. I also used these markers to colour her face, lips and eyes. For the blue background I brushed on some  Elements ink, Mermaid and Blue Lagoon. The 'bubbles' are "Pink Orbs" from Lavinia. I added a small sticker that says, "Floating". I splattered on a mix of Scottish Thistle Mica Minerals mixed with a few drops of water. Lastly I  used a fine wet paint brush to add some wavy lines down the card. The card measure 5x 5 inches. She was fun to create and this is the first time I have used her. Thanks for dropping by! Have a SUNSHINE day! Remember to always be your authentic self and shine bright each and every day!

Wednesday 19 June 2024

Happy Birthday Julie! (Nicola).

Happy Birthday to my niece, Julie!! (Nicola).  Wishing you a fabulous day with lots of fun and love!                        Thinking of you with love, and hoping you are well! I am your biological fathers' younger sister. With love from your Aunty Shona (Sunshine)! xxxxxx

Tuesday 18 June 2024

Lavinia Stamps Tree of Dreams Card!

 After watching a video by Amanda Branston, I made my own version of her card. I called it "The Tree of Dream", and it represents my own dreams perfectly. My dreams are always in colour, and vibrant and vivid. After stamping the tree, (LS Tree of Dreams) I used my Kuretake Clean Color Real Brush makers to outline the branches. Then I used a small wet brush to drag the colour out into the white space. I had so much fun creating this! Half way through, I wasn't sure I liked it, and was going to stop and create something else on the back of the card. However, I kept going - t took me a couple of hours to finish - and now I  love this card! I am my own worst critic! I have a different set of the water colour pens coming, that have different colours in. I want to create some more of these Tree of Dream cards using different colours. As I have mentioned before, I am enjoying creating 6x6 inch cards, rather than my usual 5x4 inch cards. Ok, without further ado, here is the card!


Thanks for dropping by! Have a SUNSHINE day! Remember to always be your authentic self, and shine bright each and every day!

Wednesday 12 June 2024

A New (To Me!) Technique and Some Cards.

On the card above, I used one of Lavinia Stamps Sticker Stencils (the toadstool) and another shaped stencil to colour in  the shape of the toadstool and the pattern inside the toadstool. I did carefully, and very lightly, draw around the toadstool shape with one of my watercolour pencils in dark blue. Just to darken the edges of the toadstool. I then removed the Sticker Stencil and stamped the bunny, the dragonfly, and lastly the birds. The card looks very pale, but in reality it's much darker.     The bookmark below was done on water colour card, using another LS Sticker Stencil. I don't remember exactly how I did it, but I think I used pink blue and yellow watered down Dinkles. Then I  kind 'painted' inside the shape of the Hare. After taking the SS off the card, I stamped the foliage and the three words. I also added a few splatters of the Dinkles using my fan brush. Pretty simple to make.                           
The card below is one I made some time ago, and never finished until the other day. I stamped on water colour cardstock. he cat stamp is from Katzel Craft. Not sure about the word stamps, I forget which brand they are. I also forget what I used for the background, lol! It's one of those days...
Ok, so on to this new (to me) technique I learned! I used watercolour cardstock, and with a stencil brush, brushed on green and yellow Elemnts ink. Use and water reactive ink for this. Fill up the whole piece of card.
I bought these Magic Sponges below, from my local $2 Shop, but the supermarket also sells them at 3 times the price. The pack I got has eight pieces of sponge. 
The next step is to use a stencil as shown below. My stencil has smaller holes at the top, and they get bigger as you go down the stencil. Any "hole"  of stencil will work. Take one of the sponges and wet it. Squeeze out the water as much as you can, the stencil just needs to be damp. Making sure the sencil doesn't move, carefully (lightly) 'drag' the sponge down over the holes in the stencil. Do this 2-3 times until you have done the whole piece of card.
You will the get a kind of "Bokeh" effect as shown below. Dry the card wither in the sun (it won't take long),or use a heat gun. 
You can now stamp on your card. If you want to take thigs one more step, place the hole stencil back over the card and ink on some pale coloured ink. I think I used a Distress Oxide ink, possibly Shadow, I'm mot sure. Don't do what I did, and brush the Shadow ink over the stamped image! I hade a bit of a "whoopsie" moment and inked over the image. You can see this in the photo below.
Below is the first Bokeh effect card I did, using the technique I have shown above. It's easy, quick and effective! By swiping the damp sponge over the image, it lifts and 'blends' the ink colours, giving it a soft "Bokeh"  effect. My apologies at my attempt at explaining all this. I'm not 100% well, and am in some pain and discomfort. 
I hope you enjoyed this post, and I also hope I didn't confuse you too much, lol! (Feel free to email me with any questions!) I shouldn't post when I am not well. Anyway, thanks for dropping by! Have a SUNSHINE day! Remember to always be your authentic self, and shine bright each and every day!


Sunday 9 June 2024

Meet Thayer!

This is "Thayer", one of the LS stamps. I've had him for some time but haven't used him much, if at all. I stamped him some time back, had a mental block as to how to finish the card, so I left him alone. Yesterday I decided to use a stencil from LS to stencil in some stars around him. I used some of the new Versafine Clair ink pads to stencil the stars. Then I added the corner stamps, and one of the new mini leaf cluster stamps. I used a grey ink pad for those mini leaves, and stamped off once to give a more softer look. The head piece i quite sparkly as I used some clear Stickles, some very tiny gold stars and clear gel pen. I wish I hadn't done the yellow balls of light because they did not turn out right. Oh well, too late now, they're done!

Thanks for dropping by! Have a SUNSHINE day! Remember to always be your authentic self, and shine bright each and every day!

Monday 3 June 2024

"Into The Light"

Here's another Lavinia Stamps card I made today. It took me a few hours to get it done, and my neck/shoulders are now vey painful. Most of the time I was standing, and looking down.

I used some of the Forest Realm LS stamps. I'm really enjoying using the new corner stamps, as well as making bigger cards than I normaly make. I think this one is 6x6 inches in size. I coloured everything using Mondeluz water colour pencils. The sky was coloured with a stencil brush, ad 2 different blue LS stamp pads. I lightly stenciled in some bricks around the doorway, using Versafine Clair Very Peri ink pad. I called the card, "Into The Light." Thanks for dropping by! Have a SUNSHINE day! Remember to always be your authentic self, and shine bright each and every day!

Sunday 2 June 2024

"The Path of Light"

This card measures about 6 1/2x 6 1/2 inches, so it's quite big. All Lavinia Stamps products. I've worked on it all morning, tweaking it here and there until I was happy with it! It has some sparkly glitter oh the tree's, but it doesn't show here:-( I hate that! First of all I stamped the two tree's, then the path, and lastly the sentiment. I added a few little branches using one of the mini stamps, just to pad out the tree. I used one of the Blue Dinkles for the water, and Paynes Grey Dinkle to colour the trees. I used a stencil brush to add some grey ink around the trees. The three Orbs are coloured with a white Posca pen. I stamped one of the LS sentiment stamps in between the two trees. I used a grey Versafine Clair ink pad to stamp the sentiment. Thanks for dropping by! Have a SUNSHINE day! Remember to always be your authentic self and shine bright eachand every day!