Total Pageviews

Thursday 24 March 2022

"Noof".

Meet "Noof".  She is a Lavinia Stamp and she is new and arrived on my desk yesterday.  She measures 4x5 inches, so she is quite a big girl!  he card is around 8 x 51/2 inches.  This is the first time I have stamped her, and having posted this, I now realize I have forgotten to add a bit of colour to her!  Oops! The mouse swinging from her witches hat (separate stamp) is one of six mice.  I am happy with how the card turned out and I learned things along the way.
Some more practice cards.
The card above has "Millie" and "Munch", 2 shrew,also from Lavinia Stamps.

 Tis card is very pale and was really hard to photograph.  It looks much better in real life!  And yes, he is one of the mice bunch from LS. 
Thanks for dropping by, have a SUNSHINE day!  Remember to always be your authentic self and shine bright each and every day!

Tuesday 22 March 2022

Lavinia Stamps "Zemira".


 Although I have used the Lavinia stamp, "Zemira" before, this is the first time I have used her to create a card like this one.  I watched one of Tracy's videos on how to make this card, yesterday.  I immediately had to try to re create her card, and here it is!  I am super happy how well it turned out, and have another similar card on the way!  I had so much fun making this card, and it measures 6 1/2 inches by 5 1/2 inches.  I used Neemah 80lb card stock, which was really lovely to stamp on and took the inks really well.  I used Catherine Pooler inks and added some water drops because the CP inks are water reactive.  Omg I love this card! 
Thanks for dropping in, have a SUNSHINE day!  Remember to always be your authentic self, and shine bright each and every day!

Monday 14 March 2022

The Snarky's Are Back!

Here's "Queenie" (above) and he's been caught with his back leg in the air.  I can't comment on what he may or may not have been doing because that information is censored because this blog is "family friendly". And yes, HIS name is Queenie.  No comment on that.  He's a cat.
He's mortified that he has been caught in a 'compromising' pose.  He is also bewildered that he's now being carried away by a bunch of feral ants. Oh well, a cat's gotta do what a cat's gotta do.
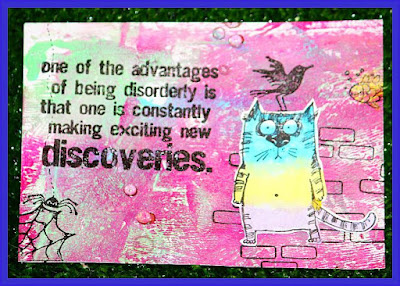
Above is "Bob".  Unfortunately he has somehow spilled ink all over himself. He has no idea how this happened. He says it wasn't because he climbed up the shelves in his craft room trying to reach the cat biscuits.  Maybe it was because he didn't want to be a Tabby cat and wanted to be a Tortoiseshell instead. We'll never know.  He's just a 'colourful cat. Let's leave it at that.
Above and below are two photos of the same tree I took early this morning.  I see this view from my kitchen window every day.  These tree's stand out amongst the rest of the green trees and when the sun is just up, the tree's just glow.  Sadly it doesn't show in photos.
I made the Butterfly card below, using a Tim Holtz "Tattered Butterfly" die.  It die cuts 2 different sized Butterflies at the same time.  I used some hand made paper I had purchased years ago.  It is blue and silver, although it looks white on here. I also used a TH die for the diamond cut out behind the Butterfly.  The top layer of white card stock is raised on sponge tape and then added to a folded white card.  I added two punched flowers and lastly glued a tiny clear glass drop in the center of each flower.  The white card stock I used is Neenah 80lb Solar White.  I am in love with that white card, it is so smooth and stamps so cleanly.   have yet to add words inside the card, this will be done when I am ready to send it to someone. 
 
This post has taken me ages to publish this morning.  I have a blocked ear and it is also somewhat painful:-( Anything that could go wrong, did!  From spelling mistakes, to forgetting a photo and everything in between!  I was distracted by my blocked painful ear! 
Thanks for dropping by! Have a SUNSHINE day!  Remember to always be your authentic self and shine bright each and ever day!

Friday 4 March 2022

Stampin' Up! Tip.

 I used the Stampin' Up! Hello Ladybug punch to make some Bumlebees on the card below! So much fun and a good way to get more from the punch other than making Ladybugs!

e card below is not quite finished.  I need to add some "Autumn" words.  The leaves are made with Tim Holtz Leaf Fragments dies. I had used sprays and inks on some card and the die cut the leaves.  The black card has been embossed using and Altenew embossing folder called Organic Linen. To get a nice crisp embossed look, I always lightly spray the card stock before I emboss it.  By the way these photos uploaded back to front.  The last photo was supposed to be first.  I was too lazy to change it! Oh, and I embossed the leaves with clear embossing powder.

The card above uses Stampin' Up! Artistically Inked stamp set.  Below is another tip I have for you! Because the stamps have sticky labels on, they are hard to remove from my acrylic block.  I have put a tiny piece of washi tape on one side of the stamp.  This makes it so much easier to remove the stamp. It doesn't interfere with the stamp sticking to the block, it just makes it easier to remove.

Below is a photo I took on March 1st, the first official day of Autumn.  The tree in the center of the photo has jus started to get some red tinges to it, the first sign of Autumn. As the seasons change, so the leaves change colours.  As the days go by the leaves will become more colourful, until they finally drop off and the tree becomes what I call, a ghost tree with no leaves, just bare.
 

I am still not feeling like doing much crafting at the moment.  Thanks for dropping by, have a SUNSHINE day!  Remember to always be your authentic self, and shine bright each and every day!