Total Pageviews

Sunday 27 October 2019

Busy Hands!

I've had a busy weekend and made some cards!  Finally Spring has arrived and the weather ha been gorjuss.  Sunny, warm and just so nice.  We've had a very wet and windy Spring, but this weekend has been a stunner!  Here are the cards I have made, so far!
The black card has been heat embossed with some very sparkly gold embossing powder, not that you can see the sparkle here!
I was very lucky to come across a lady who was selling her entire stamp collection, and so I got lot's of Stampin' Up! stamp sets at really low prices.  Really low!  I have used these sets to make these cards.  I have had a blast!
I am the sort of artist who likes to have loud music on while I stamp and make cards!  There is a great music radio station here called Magic FM, and they play music from the 50's, 60's and 70's which is my era, and so I have that turned up loud while I get crafty!  I LOVE to sing and dance while I am crafting, and the music inspires me!  I do my best work when I have music playing!  It relaxes me and it makes me feel good!
I had to hand cut the larger flowers on these two cards because I don't have the punch that matches that flower.  Yet!
I water coloured some paper recently, and these flowers on the next two cards are made from that paper.  I die cut the flowers choosing colours that matched the base caards.

 The veins on the leaves on the card below, were stamped in gold and left to dry before I made them into the Poinsettia.  Thanks to Trish for the diagonal embossing folder I used to emboss the red card.
Looking at the card below, I think I will add a coloured gem to the body on the lavender butterfly.  I must of forgotten to do that after making the card!  Ooops!

Thanks to Andrea for the window frame die I have used in the card below!  I had so much fun with this card!  I stamped the snow scene on some white card, then attached the window frame so it looks as if you are inside, looking out.  Please check Andrea's blog, I get lot's of my inspiration from her creations! Sadly you can't see how sparkly the snow scene is on the card below.
.
 So that has been my weekend, so far!  Lot's of card making, singing, dancing and just having fun!
Thanks for dropping by, have a SUNSHINE day!  {HUGS} from me to YOU:-)

Thursday 24 October 2019

Christmas Tags and a Cat Tissue Box Cover!

I made these two tags using Stampin' Up! Cheerful Tags Thinlit dies.  (Thanks so much to Trish for the dies!)
I seriously love these dies, you can do so much with them!  The top tag can be hung on a bottle or maybe a door handle.  Whichever you like.  The bottom tag can be attached to a gift, or you could make it into a card.  These weren't heard to make, and they came together quickly.  The Christmas Stocking is made from the Stampin' Up! Stitched Stockings stamp set, and matching punch.  Gold and silver stars are from the $2 Shop.
The cat tissue box cover is one I made many years ago.  At the time I made and sold dozens of them.  They were so much fun to make! 
 
 Thanks so much for dropping by!  Have a SUNSHINE day!  {HUGS} from me to YOU:-)

Sunday 20 October 2019

Stars!

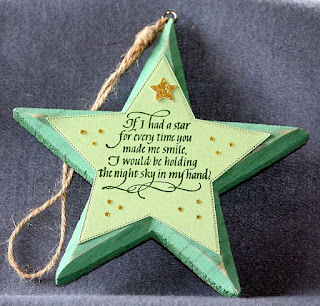
Happy Sunday everyone!  Today's post is of some 5 1/2 inch wooden stars I bought form my local $2 Shop.  They are ultra light so would be cheap and easy to post.  
 I stamped the sentiment on some red card, the die cut it using a star shaped die. I stuck the red star (card) onto the wooden star using some double sided sticky tape.  
Once I had it on the wooden star I decorated it with the gold stars. I am not sure what type of wood these are made from, but as I said before, they are ultra light in weight.  I am heading out to buy some more, as I want to use them as gifts this Christmas.  So much fun!
 Thanks for dropping by, have a SUNSHINE day!  {HUGS} from me to YOU:-)

Tuesday 15 October 2019

Embossing On...

Toilet paper!!!  I folded over about 5-6 layers of TP the length of my chosen embossing folder.  I then lightly spritzed it with water on both sides.  Then I carefully added tiny drops of different coloured inks, and then run it through my Big Shot machine.  Wow!  I got some great results!  Just remember the ink/spritzed water will possibly run from the open end of your embossing folder when you emboss it, so don;t over spritz it, and have some cloths ready to clean it up!  Yes it's very messy and yes I had loads of fun!  

 If you want to cut the paper once it is dry, you need to use either scissors or tear it by hand.  It wouldn't cut using my paper cutter.  It feels like hand made paper when it is dry, which I suppose it is in a way!
If you want shapes, such as circles, stars or whatever, die cut them before you spritz the paper.  I have yet to make cards with these, but that's on my to do list!
 Another hint, don't use too much ink/spritzed water because, like below, the colours run and you end up with a mud colour:-(
 So that's what I did today!  Suddenly toilet paper has taken on a new purpose!!  Another thing you can do is throw some fine glitter on the wet paper before you emboss it.  Once it is embossed and has dried completely, give it a light spray with some cheap hairspray and this will ensure the glitter stays on.
Ok that's me for today, I have two hungry cats telling me it it their dinner time!  Gotta go!  Thanks for dropping by, have a SUNSHINE day!  {HUGS} from me to YOU:-) 

Thursday 10 October 2019

"Believe!"

I made the card above using a 3D embosing folder from Crafters Companion (Gemini) I got recently.  Wow, they are so much fun, and give  a really deep impression!  For this card, I used some very thin gold foil.  It is on a roll and I have had it for YEARS! There are miles of foil on the roll. I embossed the word "Believe" first, than carefully glued it to a red card.  You need to make sure you don't press on the embossed bit, or it will flatten it.  The card is very shiny in reality, but it looks rather dull in this photo.
Thanks for dropping by, have a SUNSHINE day!  {HUGS} from me to YOU:-)


Wednesday 9 October 2019

"Snowy!"

 I had been looking for the stamp above, ("Snowy" from Penny Black) for a little while.  I joined a NZ Destash/buy/sell site on Facebook and advertised that I was looking for this stamp.  A short time later a lovely lady called Tracy contacted me and said she had one she would be happy to sell me!  So he arrived late yesterday, and this is the card I have made using him.  I struggled badly yesterday, I had an extremely painful shoulder as well as a bad headache and neck ache all day, so crafting was not easy.  Today is marginally better, but I still have pain in my shoulder and I still have a headache:-(  I water coloured "Snowy" using my water colour pencils.  The bushes behind "Snowy" have tiny sparkly gems on them and are very sparkly in real life.  Sadly this photo doesn't do the card justice.  Deep *sigh*!
Anyway, thanks for dropping by, have a SUNSHINE day!  {HUGS} from me to YOU:-)

Sunday 6 October 2019

Just For A Giggle!


I found the above on someones Facebook page and decided to share it with my fellow bloggers!  I also put on my own Facebook page.  So funny!  Hope it gives you a giggle or two!  And don't forget to share it with others! 
Thanks for dropping by!  Have a SUNSHINE Sunday!  {HUGS} from me to YOU:-)

If I Had A Star...

The words on the card below, are a stamp I got recently from Quietfire Designs. They have some lovely stamps, dies etc.
 To make the background I spritzed a sheet of white card with water, then using a brush (see last photo) I dropped a couple of drop of a Stampin' Up! re-inker in Turquoise onto the brush and then just carefully swooshed it across the white card. These brushes are super soft and blend the inks well. I also used some SU Lilac re-inker drops to blend in a bit of colour.  Once the card was dry, I added some drops of SU Shimmer paint (Frost) over the card.  These took longer to dry, I had to leave the card over night until it was dry.
 I die cut a circle of the water coloured card and stamped the words on using a Versafine black stamp pad.  I cut another circle out of thicker card and stuck the two together.  I adhered it to the card using some sponge tape to give it some dimension.  The hand was part of a stamp I had and had used it once. The stamp originally had two hands on it.  I decided to take the stamp off the wooden block and cut off the stamp I wanted to use.  I used my Tim Holtz Stamp Platform to stamp the hand.
After colouring the hand using my Copics, I carefully glued it to the card, and then began arranging the stars.  I adhered the water coloured card to a piece of dark blue card, then finally on to a folded white card. Below are the set of brushes I used to swoosh the re-inkers across the white card.  These are absurdly expensive here, in the craft stores, so I bought mine (a set of ten) from AliExpress for around $15 NZD.  FREE postage!!  I refuse to pay the asking price in craft stores, it's daylight robbery and totally disgusting to be ripping people off like that.  A few months back I did purchase ONE of these makeup brushes (a larger one) from a retail shop here, it was in the makeup department and cost me twice what ten brushes cost me!  I use it to apply my foundation - when I can be bothered wearing it! In all honesty, it does make applying your foundation super quick and it gives good coverage.  Just saying!
Ok, so that's it for today, so far!  Thank you for dropping by!  Have a SUNSHINE day!  {HUGS}from me to YOU:-) 

Tuesday 1 October 2019

While I was at my local K.Mart recently, I saw this 3 tier vegetable container.  My (crafty) brain immediately said, "You could put your Stampin' Up! stamp sets in there!."  So I bought it! 
It's very light and was easy to put together - done in a minute!  Above is the bottom tier, and below is the middle tier. 
Below is the top tier which, at the moment, has my embossing folders in. I hang my spray bottle of water on the middle tier so it is easy to reach.  I came home and apologized to my vegetables..the potatoes, the pumpkin...etc!  
By having some of my craft things in this, it gives me more room on my desk and it is easy to access, and to see things.
Below is the(sadly empty!) bag that had some very yummy and delish candies in that Andrea sent me!  They were soooooo nice!  We have something similar here, and they are called, "Alligators!"  Very similar taste to the Swedish Fish! Thank you Andrea!!

Ok, that's all for now, thanks for dropping by!  Have a SUNSHINE day!  {HUGS} from me to YOU:-)