Total Pageviews

Saturday 28 November 2020

Santa's Elve's Steal The Presents!

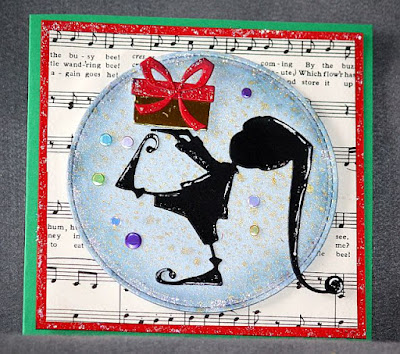
 I made these Elf cards last week.  I bought the Elf die set last year, and this is the first time I have used them. These were a lot of fun to make and I did them on a production line!  I hope you enjoy them!


I used a Hero Arts stamp for the card below, it is a large 6x6 stamp called "City Block".  I added a small wooden house to the bottom of the card, and coloured a few of the windows and plants.  I stamped and cut out the hearts from a SSS stamp set called Missing You, and stuck it to the card using sponge tape. It was a nice quick and easy card to make, and I like how it turned out!

I have  very sore neck/back muscles at the moment - thanks to having Fibro, and the pain is stopping me from creating anything much at the moment.  I've had the pain for about four days now and I am OVER it!!  Anyway, thanks for dropping by, have a SUNSHINE day!  {HUGS} from me to YOU:-)


Friday 20 November 2020

Why I Use "Magic Mats" For Die Cutting!

 A couple of weeks ago I purchased two "Magic Mats" from Scrapbook.com. (They are in USA, I am in New Zealand) The mats are new on the market and are used to replace your acrylic mats that warp after awhile of using them.  I was skeptical that these mats would be as good as they were being promoted.  I have had many "issues" with dies not cutting out properly, especially intricate dies.  "Magic Mats" fix that issue! Below is a photo of one of "Magic Mats."   It is smaller than the usual platforms that come with the Big Shot Plus.

The "Magic Mats I got measure 6x8.75 inches.  I got two mats because if I want to cut multiple dies at once, they will both fit on my Big Shot Plus.  You can see how both mats fit on the platform below.  You use the "Magic Mat" with the die and card on top, then place one of your acrylic platforms on top and run it through your die cutting machine.
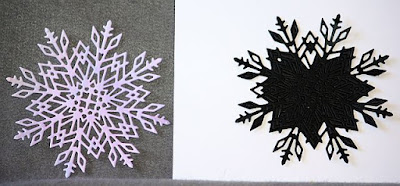
I die cut my favourite snowflake die which is fairly intricate and was never easy to die cut.  The white snowflake was dies cut using the "Magic Mat".  The black snowflake was die cut using my acrylic plates.  Can you spot the difference??!

The black snowflake did not cut out very well and left bits stuck in the die cut.  It would take me a good ten minutes + to get all those 'bits' out, and was not all that successful.  Whereas when I used the "Magic "mat, the bits were all cut out!  (below).
So that's why I use the "Magic Mat" for ALL my die cutting!  They give a very clean cut every time:-)

No, I not affiliated in any way with Scrapbook.com, I am just a very happy and grateful customer😊.

A huge shout out of thanks to Scrapbook.com!!  Not only are these mats AMAZING, but Scrapbook.com (USA) somehow managed to get my mats to me in super quick time - I am impressed and very grateful!!  Below are my old, warped acrylic mats...now in retirement!

Thanks for dropping by, have a SUNSHINE day!  {HUGS} from me to YOU:-)

BTW: I have not used my acrylic mats for die cutting for a long time.  I have been using cutting mats I bought for $5 each.  They work perfectly, but are also now retired with the acrylic ones, as the Magic Mats are 100% better!  (And much lighter!)


Sunday 15 November 2020

White Christmas Card & Two Bookmarks.

I've worked on the Christmas card above, for some time today.  My thumbs are very painful and so it took me ages to get the card together.  I haven't used corrugated card on my cards for some time.  Several years ago I bought several packs of it from my local $2 Shop.  The shop has since closed, which is a shame because I used to buy lot's of craft things from them.
Anyway, I like how the card turned out - in spite of it taking me so long to finish it!
I also made two bookmarks using the Lavinia stamp, "Keeping Faith."  I used water colour paper and made the back grounds using some Distress Oxide inks.  It wasn't easy to stamp the words on the paper.  Maybe I could have used and embossing ink to stamp it?  The Versafine stamp pad, although well inked, just wasn't stamping it very well.  I used my stamping tool so I could keep inking the stamp, but it was a job!  No wonder my thumbs are sore today:-(
Thanks for dropping by, have a SUNSHINE day! {HUGS} from me to YOU:-)


Friday 13 November 2020

Lavinia Stamp

Just one card today, I have been feeling fatigued again and am struggling to do any crafting. (Or anything for that matter.) Anyway, I love this stamp above, it's Lavinia a Stamp and is called, "Keeping Faith".  I think the words are just right for this weird year we have been through.  I have used my gel press for the backgrounds, and added some gold spray over the top.  I added some clear glass droplets and the card was finished.

Thanks for dropping by, have a SUNSHINE day!  {HUGS}from me to YOU:-)


Tuesday 10 November 2020

Meet Alexa!!


Meet "Alexa"!  I was asked by the  NZ Blind and Low Vision Foundation (Of which I have been a member form around 50 years) if I would like an "Alexa", for free!  Of course I said, 'yes please!'  The MSD donated 3,500 Alexa's to the foundation and I have mine set up beside me in the dining room!  I'm busy asking her all kinds of questions, and have gone through the voice recognition thing so she recognizes my voice and understands my accent!  We're having SO much fun!
Thanks for dropping by, have a SUNSHINE day!  {HUGS} from me to YOU:-)


Monday 9 November 2020

Posting My Christmas Cards Early.

I am posting my overseas Christmas cards early this year.  Because of the Pandemic and borders being closed, the mail takes close to a month to get to the USA from here, and vice versa.   So if you get a card from me EARLY, don't panic, I am just making sure you get it in time for Christmas! 
Okay, the tags above are an SU die set called "Merry Tags".  I used some gold mirror card and don't you know it, it looks BROWN in these photo's, lol!
I made this white vellum flower using the SU punch and stamp set in the following photo's pictured below.  I stamped the flower three times in white ink and embossed it in white, ditto with the leaves, then punched them all out.  I used small glue dots to hold the layers together.  I think I am going to put it on a card.  Black, or white card?  Which do you think?!

And in the photo below, is "Romeo-Valentino" demonstrating a new use for my embossing box - a comfy place for him to sit in the sun, watching the birds out the window!  Luckily there was nothing in the box waiting to be embossed!
Thanks for dropping by, have a SUNSHINE day!  {HUGS}from me to YOU:-)


Sunday 1 November 2020

Weekend Crafting!

For the card above, I embossed a snowflake stamp in white ink.  Then I used the tip of a pointy sponge to make the blue rays.  I also used a cotton bud to get some smaller rays.  I stamped the sentiment (Suzanne Cannon Design from Emerald Creek) and embossed that in white as well. I added some clear glass drops and the card was finished. 
For the kraft coloured card above, I used a Stampin' Up! stamp set called, "Wishing You".  I masked the presents stamp and stamped it in green and red.  I added the words in black ink.  I made two of this design.  I was aiming for the 'clean and simple' look, after admiring some cards on Andrea's blog!  She does great 'clean and simple' cards!
The card above was another 'clean and simple' card I made.  I used a piece of scrap card cut in a wavy line, for the hills, and lightly brushed some SU Tip Top Taupe ink on to make the hills.  I also stamped the tree - also SU "Lovely As A Tree" stamp set, using the same ink colour.  I think I might make another card the same, but this time give the tree a bit of colour using some red Nuvo 
crystal drops.
Two Christmas tags, above and some book marks below!  For the tags I die cut a frame from some gold/brown card, and added a circle of Christmas paper behind the frame.  I die cut 2 small reindeer and glued one to each tag.  I added a gold star and a circle of white card on the back so I can write on each tag.
The bookmarks below have a Rainbow Snowman stamped on them.  He is an Impression Obsession stamp.  So cute and so much fun to play with!
Thanks for dropping by, have a SUNSHINE day!  {HUGS} from me to YOU:-)