Total Pageviews

Monday 26 January 2009

Falling Softly For You


I used my spider web cb embosing folder for the black card & added Kindy glitz to parts of it. After stamping the Pixie, I coloured her & cut her out & stuck her tot he black card. I carefully glued some stretchy spider web underneath her so it looks as though she has landed on the web. The colours are brighter than they show here. I also added 3 gold stars to the card. The words are hand drawn & they are on the inside of the card. Thanks for visiting & I hope your holiday weekend went well!

Sunday 25 January 2009

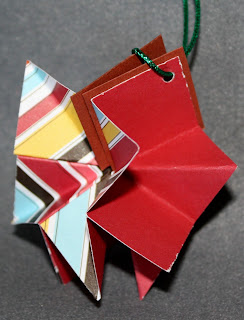
Star Ornament


This Star Ornament is very easy to make! I hope you can follow the photo's well enough to make one! Start with four squares of double sided paper & two pieces of matching card just over 1/4 of the size of the double sided squares. These are for the front & back of the star. The paper I used is reasonably heavy & holds the shape well. First of all fold each square in half, then in half again. Then open up the square & fold diagonally. Fold diagonally so plain side of paper is on the outside. Following the photo's fold & join each piece as shown. Photo four shows the two folded squares ready to be joined. (I used double sided tape) Fold & join the four squares & lastly add the second piece of card - slightly bigger than the folded squares - to the multi coloured side of the paper. Punch a hole in each piece of card & join as shown. If you thread the ribbon from the outside of the star to the inside, it will then hold the star open when you hang it up. Phew! Hope you can follow these instructions & these stars really are easy to make! They fold up easy enough to post as well! (Thanks to my awesome friend Rosy who sent me one of these in the mail last week! She assured me they were easy to make & by looking at the one she made me I was able to see how it was done!)
Have an awesome fun day & thanks for visiting - call in again sometime!

Saturday 24 January 2009

"A New Pixie On the Block"!


Is this a gorgeous stamp or what?! I just love her! It is from Stamps Happen & is called "Falling Softly".
I used my tiny bubbles cuttlebug embossing folder for the blue background card. I then stamped the stamp onto white card & cut out the oval shape. Once I had coloured her I re-stamped the flowers, cut them out & added them to where they should be had I not cut the oval. (If you know what I mean?!) I added Kindy glitz to various parts of the image & also to some of the bubbles on the blue card. I felt that the bubbles added to the impression of "Falling Softly"! The white card is actually glossy photo paper - it stamps verrrrrrrrrrrry nicely!!
Raewyn, if you're looking...this one's for you! Thanks to Audrey T for this stamp! Well, the Cicada's are singing, it's stinking hot & even though I have all the windows in the house open, there is only a tiny bit of breeze coming in! I am not complaining at all, I love the heat! It just saps my brain that's all!
Thanks for visiting & have a fab weekend!

Sunday 18 January 2009

It's All About Love!


Ok, this card is for a contest that Bizzybecs is holding. The words are on the inside of the card & are a stamp from D.J Inkers. I have made the white hat from circles cut out using my nesties. I cut the largest one first & run it through my Swiss Dots cuttlebug embossing folder. The smaller circles I stacked together using sponge tape, to give it height. I also used the Swiss Dots folder on the top circle of the hat. I then added some paper flowers to the hat & put a stick on pearl on the center of each flower. The head, hands & feet stamps are a set from Annette Allen Watkins & the stamp is called "Sarah Jane". I cut her legs in half & added sponge tape twice to the left hand foot to make it appear that her foot is over the right one. The head & hands are stuck on with sponge tape also. I added small bows & pom-poms to her hair. I layered the white card onto some lavendar Bazzil card, then finally onto some pink Bazzill card. I used one of my EK Success corner punches for the fancy corners & folded them back as shown. I added some Kindyglitz & gold cord as shown.


I cut out a scallop circle of net material which I stuck underneath the hat before sticking it to the white card. Lot's of work but also lot's of fun! Hope you enjoy it!
Thanks for visiting, see you soon!:-) The card measures 5x6 1/2 inches.

Book Of Angels


These angels belong to the post below, they somehow got left behind! There is one more to come but she is lost out there in the "Twighlight Zone" & I can't find her on my blog images! Weird, but when I do find her I will post her! This book was alot of fun but time consuming. See you next post!

Book Of Angels


Here are some pages from a little book I made, all about Angels! I have used my Bind-It-All to make the book & stamped various angels stamps on each page. It looks better IRL! For the Money Angel I added some Chinese coins & gold string. Lots'a fun but took quite a long time to complete it!
Thanks for visiting & I hope you are enjoying your Sunday!

Tuesday 13 January 2009

An Angel for You!


Oh I Y this stamp! I won it on Trademe.
It is JLR Design stamp. Not sure who they are but maybe someone knows? I took a close up of the angel so you can see the details easily. I cut out the angel & used sponge tape to give her some height. I also added lot's of Kindyglitz (where would I be without that stuff?!) & some gems. I used my nesties for the scallop squares & the rectangle at the bottom. To get the rectangle long enough I cut it twice & joined it then put the gems over the joins! Hey! I'm SHORT not stupid!! I'm not sure who the "Love Holds Friends Together" words are from as there is no name on the stamp. I think I got that stamp from Dymocks one time.
I coloured her with my copics for no other reason than they were the closest markers within reach at the time! Lazy, huh!
Surprised I even made a card today as I have spent alot of my day sitting on the loo due to food allergies! Oh, information overload!
Thanks for visiting & have you been to my other blog?! If you like photographs, pop on over & have a look! It's very new and still under construction! Here's the address http://www.ladyinredphotography.blogspot.com

Sunday 11 January 2009

Pink Box


This box I made (using my scorpal) is about 3 3/4 x 3 3/4 inches square. After cutting out the box, after scoring it, I covered it with some pretty paper, added the ribbon & flowers & that was it! I intend to make some square cards to go inside the box.
Sorry this image is a bit blurry:-( The humidity is getting to me lately!
I am not doing alot of stamping at the moment as it is too hot & humid & I seem to have 'lost the plot'!! I am also very tired, which doesn't help:-(
Thanks for your visit & have a great day!

Thinking of You


This card is a sparkly silver colour, one that is hard to photograph well. The flowers are a Cuttlebug embossing folder & the words are from the die that goes with it. The words are actually cut from pink card, but it's not showing up too well! I added some gems to the centers of each flower & that was about it. Nice & easy! Thanks for visiting & I hope you are having a good weekend:-)

Embossed Butterfly


Oh heck! I forgot to crop this before posting it :-( Bit late now! The blue star background is actually part of an envelope that had a Christmas card in it. It was so pretty I just had to "save" it! I cut the flower shape & the scallop circle using my nesties. The butterfly shape is a cuttlebug die which is also embossed. I added some Kindyglitz to the daisy & butterfly. There are also some very tiny gems which are not easy to see on here.

Thursday 1 January 2009

Butterflies


Happy New Year everyone! I hope 2009 is a good one for you where ever you are in the world!
These butterflies are done with a cuttlebug die & embossing folders. They are SO much fun!
After I had uploaded this I realised that one of the pink gems had fallen off before I took the photo! Ooops:-( These cards were easy & quick to make, which is great because it is so hot here right now that I don't have alot of energy!
Thanks for visiting & have a great week!

Cuttlebug Butterflies


I found this new white card recently, it is really nice to make to cards with. It has a very smooth almost silky feel to the card & takes a stamp really well. (The inside of the card says' "Thoughts of you flutter by on the breeze".) I think the card brand is "Flying Colours" & is available from The Stationary Warehouse, for those Kiwi's interested!
It also embosses really well too. The little diamond gems on here are really sparkly IRL. And I totally forgot to crop the image before I blogged it! I blame it on the heat!

Spots & Butterflies!


We are in the middle of summer here in New Zealand & I can tell you, it is HOT today! I have all the windows & doors in the house open & luckily there is a tiny breeze coming in which is helping to keep me 'cool'! I LOVE the heat & look forward to many more hot summer days!
For this card I have used a cuttelbug embossing folder for the card itself. Then I have cut & embossed a butterfly, also a cuttlebug die/folder. I put a strip of red ribbon with hearts on before I added the butterfly. Oh-so-simple to make! I'm lovin' these butterfly folders, they are so cute! Thanks for visiting & have a great week where ever you are in the world!