Total Pageviews

Sunday 30 July 2023

Another Trip To Hospital And Some New Cards!


So I suddenly became very unwell yesterday and ended up back in hospital overnight. I'm back home again now and have a couple of cards to share. Both use some of the new release Lavinia Stamps. The tree branch on the card above, was designed to be stamped sideways, across your card but it looks great stamped upright too! The flowers and the small foliage are both separate stamps. I used some LS stamps pads for stamping both the tree and the flowers etc. The Owl on the card below, is called "Gus".  There are four different Owl stamps in the new release, ad each one is just beautiful, with lot's of details in it. I coloured "Gus" using my Dinkles, and a small paint brush. I put some of each colour Dinkle into a tiny bottle with a needle point tip. I then filled the bottle with water. This way I can put just a tiny drop on to an old plate, water it down if needed, and carefully "paint" my Owl. Lot's of fun to see "Gus" come to life as I coloured him! He's more colourful in reality!
Thanks for dropping by! Have a SUNSHINE day! Remember to always be your authentic self, and shine bright each and every day!
 

Saturday 22 July 2023

Late Night Brainwave


 Yay! I figured how to make this card, late last night!!  I had gone to bed and was watching TV.  All of a sudden, it dawned on me how the card was made! I wanted to get up an make the card right then, but because it's the middle of Winter here, and my home is not heated, I stayed in bed. As soon as I got up this morning I made the card.
Here is how I made it. First of all I drew through the inside of the actual spotlight stencil onto some masking paper. I carefully cut out the two pieces and put them to one side. I then placed the LS Lattice stencil on my card, taping it down so it didn't move, then I  placed the spotlight stencil over top. I then lightly brushed on some Violet LS ink. (I used an LS stamp pad)
Then I removed both stencils. I placed the spotlight stencil back on my cardstock, making sure it was in the correct place, so I could see the lightly inked pieces of the spotlight stencil.  I then stuck the 2 cut out masks back inside the spotlight stencil, making sure they were firmly attached to the card. Then I removed the solid spotlight stencil. 
I then placed the Lattice LS stencil over top of the cardstock, and brushed Violet LS ink  over the card. Once I was happy with the coverage, I removed the Lattice stencil. I then removed the sticky masks I had on the card.
Then I stamped Tilly and Tango, the LS mice, and the LS star circle, and the card was done!
I hope my instructions are clear enough, if not, just contact me and I will try to explain. So the creator of the original card like this, omitted to say she had made a mask for the spotlight stencil, and she refused to elaborate on how she made the card when I asked, twice. Well I am more than happy to share how I made my card, and I hope you have fun making cards like this! I will make some more cards like this, possibly in different colours. Thanks for dropping by, have a SUNSHINE day! Remember to always be your authentic self, and shine bright each and every day!

Friday 21 July 2023

New CardsNew Stamps!

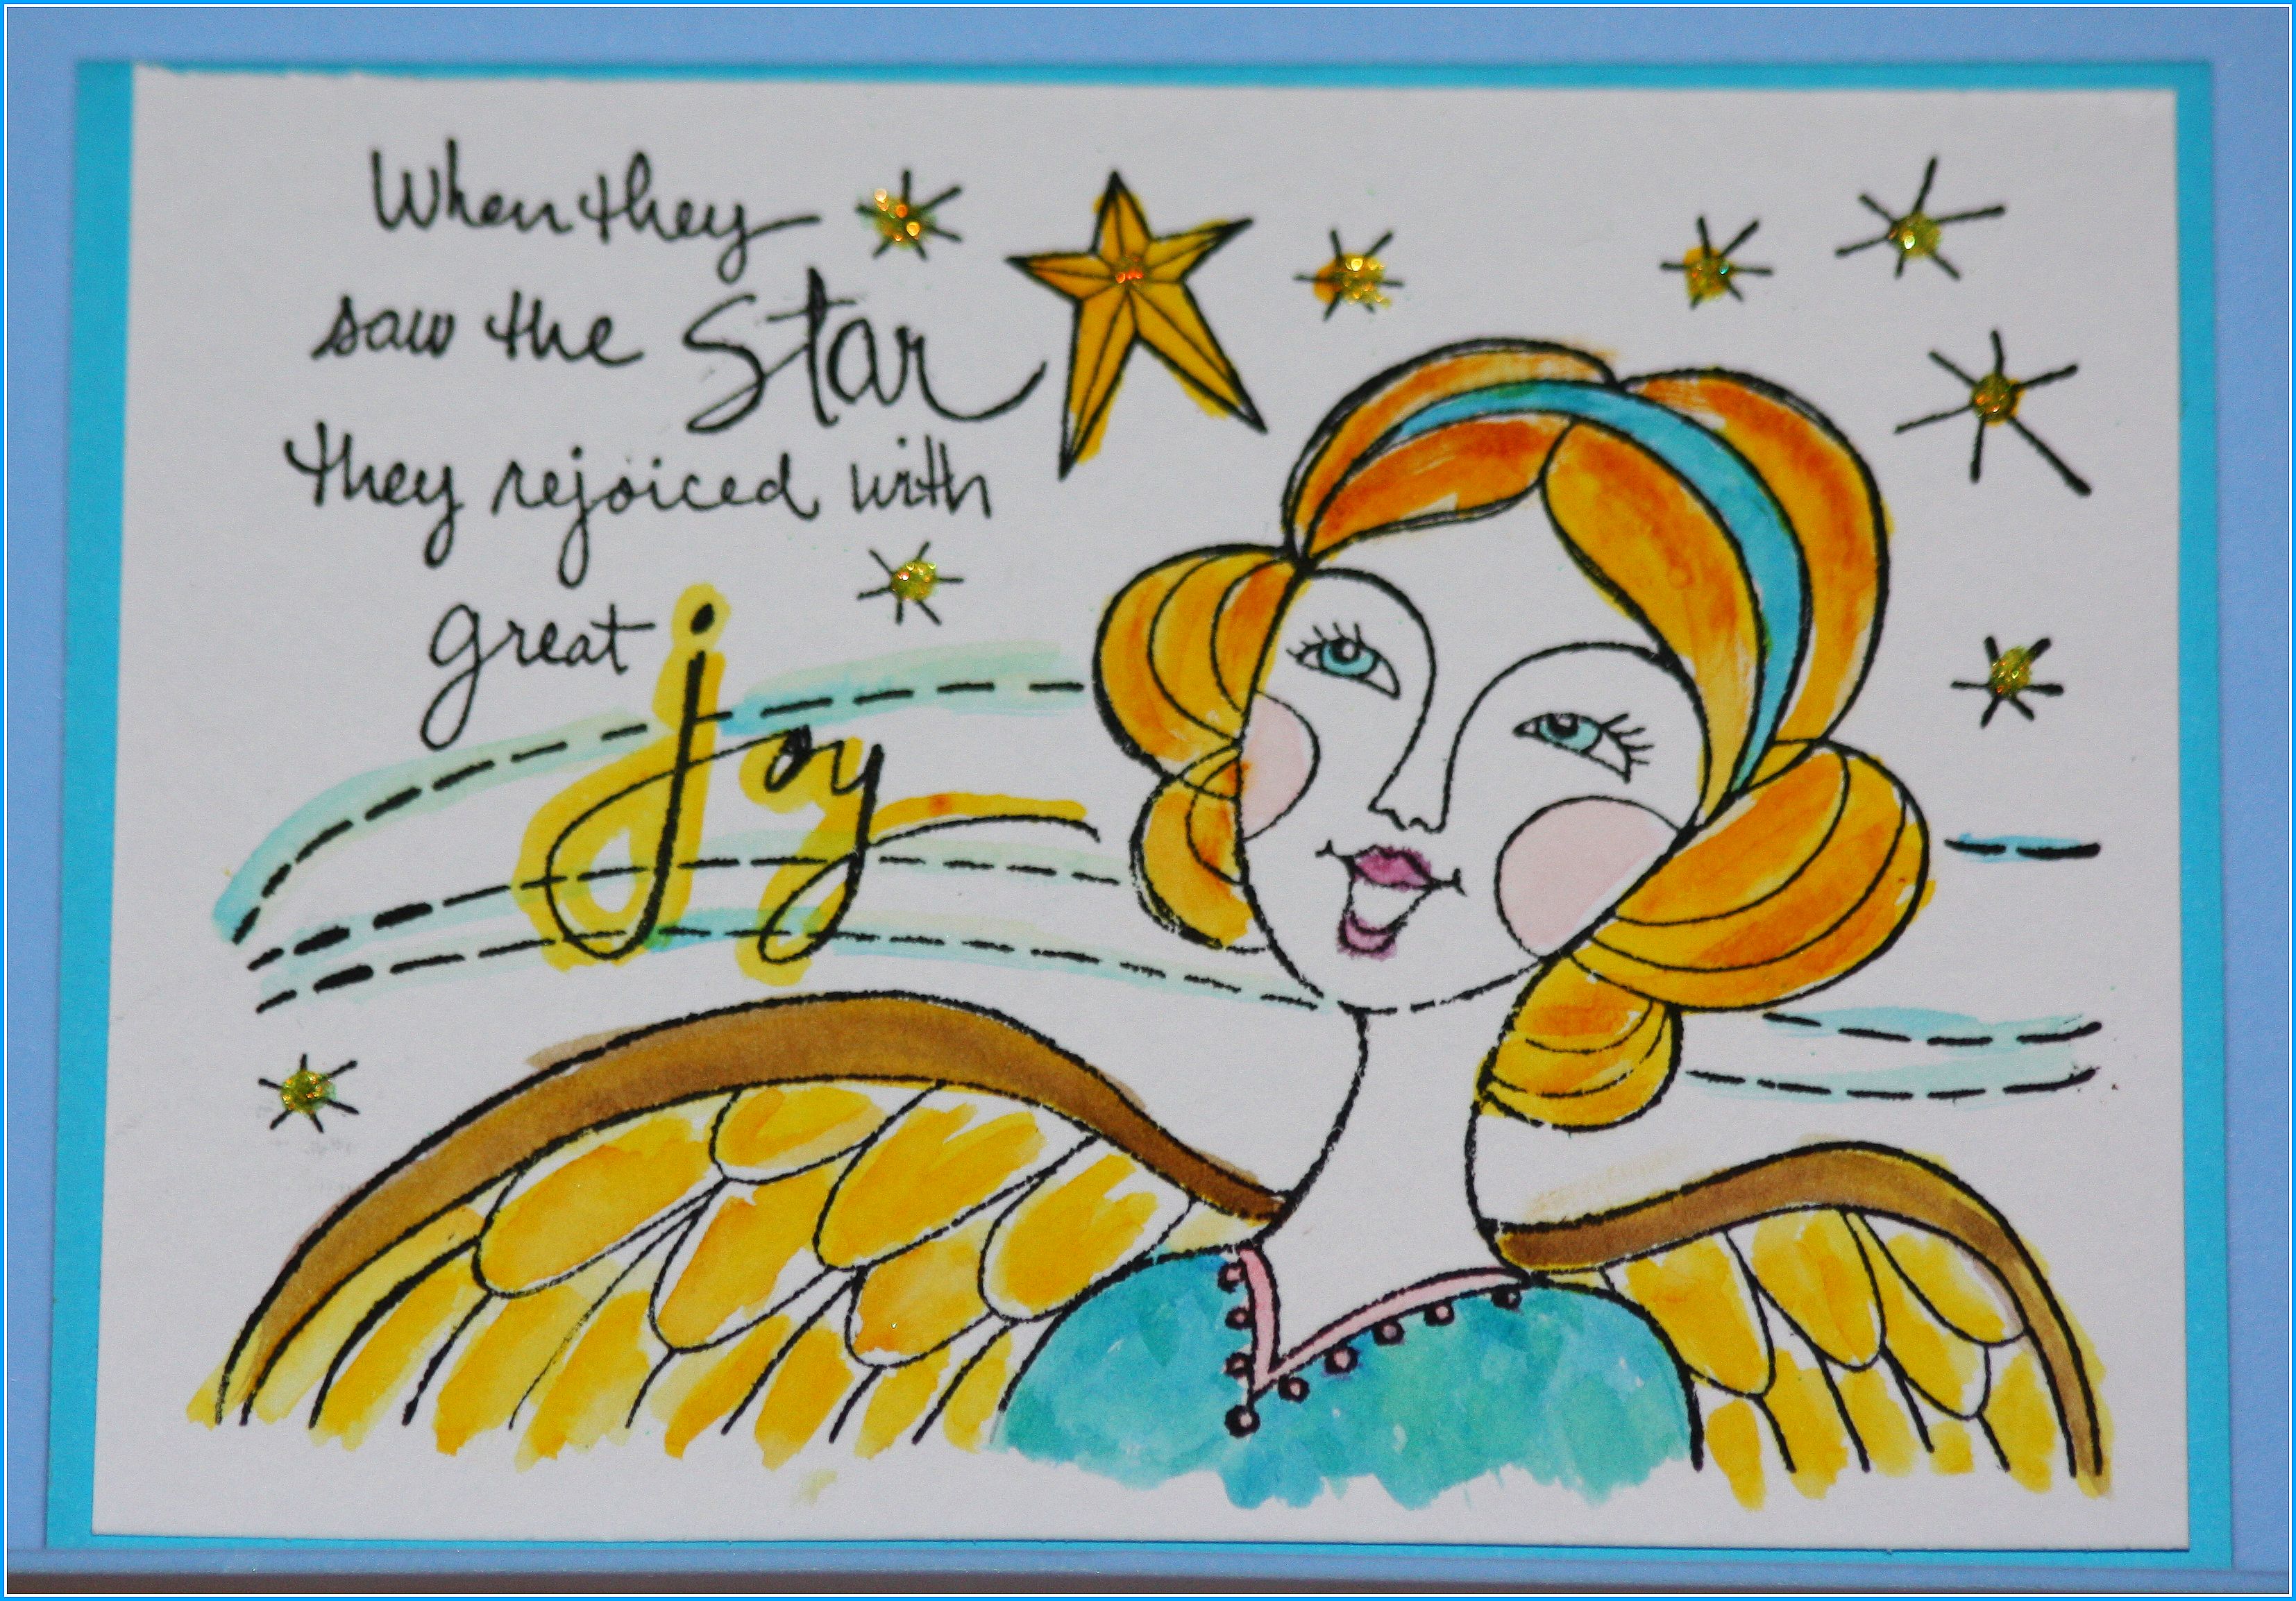
The stamp on the card above, is from Chocolate Baroque. It was an unmounted stamp, one that I bought at SENZ, which I went to TWICE last weekend! I have used Dinkles to colour her. Dinkles are some vibrant coloured powders that mix with water. They are from Lavinia Stamps.
The bears above are a set of dies from Waffle Flower. These dies were released back in early June this year. However, they sold out really quickly, and I had these on pre-order. They arrived yesterday. They have a small piece that folds backwards behind the card. You stick that bit behind the bears. Below is the card (bears) open. You can write a message there, or on the back of the card if you like. Another option is to glue the bears so they don't open their arms, it's up to you. These dies come with flower dies and well as 'ear' dies, and some heart dies. I had fun making this card and will be making some more of these cards in different colours.
I made the card below after watching a video by Jo Rice. She's one of the Design Team from Lavinia Stamps. She has some lovely tutorials. I used Mixed Media card as I knew it would tolerate the water I used. I used a "Mop" brush, which is a brush that holds a lot of water/fluid.  I also used my Dinkles for the colours. I put some of Dinkle powder on to an old saucer and added lot's of water to make it quite we t. After sploshing my Mop brush into it, I ROLLED the brush across my card mid center from one side to the other. I made the first roll in green. I did the same thing with the green, just below my first roll. I did the same roll technique using orange, making sure this colour  was blending with the green and just a titch above the green.  I then di exactly the same technique with the yellow Dinkle. I drew a dark line across the middle of the green.  I then used some blue Dinkle powder to make a pale sky, and water.  The rick is to have a very wet brush, and ROLL it across your card. I added some trees and tiny houses, from LS.  Adding the reflections from a second stamping without re-inking the stamp.  I added some foliage and the card was finished. My instructions are not that good, so please contact me if you need clarification on anything!  

This cute little bloke below, is "Bijou" and he is one of the new stamps from Lavinia Stamps. Everything on the card, including the background is all Lavinia Stamps. In the new range of LS stamps, there are four absolutely gorjuss Owls, and "Bijou" is the baby! As I said, the foliage and words are all from LS. I made the background using my Dinkle powders. I stamped over the top once the background was dry.
The card below has "Sebastion the Sea-Horse stamped on. Another LS stamp, another one that I bought from SENZ last weekend.  I made the background using my Dinkles.  All the stamps are from L>S. I used some Stickles on the bubbles to give them some sparkle.
The card below is similar to the one in the post before this. The person - Sam-Squires - (real name Samantha Wilby) will not tell me how she made it. I sent a copy of her card, with her instructions, to Lavinia Stamps, because that is where I first saw it, to see if the can figure out how she did the stenciling. They couldn't figure it out either. To be  honest, Sam is the only crafting person I have come across who will not share how she made the card. I am disappointed as I have asked twice, but she just says, "the instructions are on my blog." Her blog is called "A Crafting Niche". She is also on Face book if you want to look her up. So below is my version of her card, but without the stencil work.
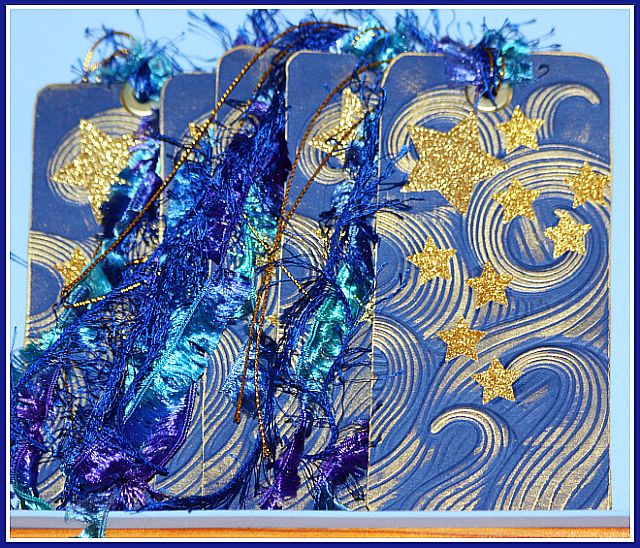
Below are two Matatiriki tags.  The one on the left is one I made, and wore to SENZ las weekend. The one of the right is one I did a swap with. I cannot remember her name ad she didn't write any details on the back. I was extremely disappointed as she was the only person who was wearing a Matariki tag. So I wasted my time, energy and materials making ten of them. As I said, I went to SENZ on two of the three days. I went on the first day, which was Friday. What a day! Disappointment #2 was when I got t the show. It was a lot smaller than I had expected. I have been to SENZ many times and it has  always been in the large Pavilion. This time it was in a much smaller 'hall'. Everyone was commenting how small the venue was., and how there wasn't as many stalls there. I got to the show on a bus, then a train, then another train, and finally a very short bus ride. Well that was fine, even though the hosw was not in an area I am familiar with, I managed to find my way.
Coming home was a disaster.  I left the show at around 1 pm, got a bus, then the train. Got off that train and was supposed to get a different train. However, that next train has been cancelled. Why??  Because some beeping tourist had driven onto the train tracks, driven through two train tunnels and become stuck on the train tracks. I was NOT impressed. Not knowing the area, I hadno idea how I was going to get home, as I had a long way to go. They announced that there was a rail replacement bus that would get me to where I needed to go. (Which was another train station where I would get a Western Line train, then a bus home) So I asked if this bus would go to the train station I needed to get to, and was ASSURED it would. So I get on. Well cutting a long story short, it didn't go anywhere near the train station I needed. Instead it went to Britomart, which is in Auckland City.  But it took two hours to get there!!  I was not happy, as it had to follow the rail line and stop at each station and went all over Auckland, and in and out of suburbs I have never been to. So I finally got a train from Britomart, and then a quick bus home.  I got home at 5 pm, fours hours after I left the craft show.  The whole trip, if the tourists had not driven on to the train lines and gone through two tunnels, got stuck and stopped the trains, would have taken me an hour and a half.  So I got home at 5 pm, closed the curtains, fed Romeo, had a couple of cups of tea, got into my pajama's and went to bed!  It was a very exhausting day for me, and my M.E. did not enjoy it:-( But I did get some craft things I had wanted, and met up with Meetu, who owns Krafters Cart here in NZ.  I have been buying craft things from her for many years, but because he shop is not local, I had never actually met her in person.  She is truly lovely and such a genuinely nice lady. (And short like me!)
So that was Friday.  I swore I was NEVER EVER catching another Rail Bus! On Saturday I rested most of the day, because of the M.E making me feel exhausted, and I was also in pain from the Fibromyalgia. No doubt bought on by stress.  I also had NO plan to go back to the craft show on the Sunday which was the last day of the show. However, Sunday morning I decided to go back...was I crazy?! So I left on the bus (short trip) and when I went to wait for the train here was an announcement  that there were NO trains running between Britomart and Otahuhu, but there were Rail Replacement buses! Are you kidding me??! So I went to the office and asked how do I get to Otahuhu?  He very kindly pointe me to the 670 bus and said that bus will take me there, and then I get a train (short trip) to Manukau where the show was.  I asked him if it was a Rail Replacement bus, nd he said...NO!  Yippee! I got on the bus and was at the show in just over an hour. It was a lovely bus trip, and wen very quickly.  I did the same trip back and was home within two hours. Yes I was (still) exhausted, but it was so worth it. Being the last day of the show, it was not crowded, I could easily see everything, and all the stall holders had sales, with a lot of things marked down to half price! I had a way better time than I did on Friday, as it was easier to move around.  The aisles were very narrow, and that was another thing everyone was commenting on on Friday. I got to chat with Meetu and her sister, who is from Australia, as well as meeting her son and daughter. I bought a lot more craft things too! Apologies that this is a long post!
Ok, thanks for staying with me, and for dropping in! Have a SUNSHINE day! Remember to always be your authentic self, and shine bright each and every day!  (And stay away from Rail Replacement buses!!)
 

Monday 3 July 2023

Tags For Matariki Swap


What is Matariki?

Matariki is the Māori name for the cluster of stars also known as the Pleiades. It rises in midwinter and for many Māori, it heralds the start of a new year. Iwi across New Zealand understand and celebrate Matariki in different ways and at different times.

Matariki is an abbreviation of ‘Ngā Mata o te Ariki Tāwhirimātea (‘The eyes of the god Tāwhirimātea’) and refers to a large cluster of stars, known in some European traditions as the Pleiades. According to Māori tradition, the god of the wind, Tāwhirimātea, was so angry when his siblings separated their parents, Ranginui the sky father and Papatūānuku the earth mother, that he tore out his eyes and threw them into the heavens.

The cycle of life and death

Traditionally, Matariki was a time to acknowledge the dead and to release their spirits to become stars. It was also a time to reflect, to be thankful to the gods for the harvest, to feast and to share the bounty of the harvest with family and friends.

Matariki revived

Matariki, or Māori New Year, celebrations were once popular, but had largely stopped by the 1940s. In the 2000s, they were revived. Now, thousands of people take part in events to honour the beginning of the Māori New Year, and in whānau celebrations to remember those who have died and to plan for the year ahead. From 2022, a public holiday celebrating Matariki will be held on a Friday in June or July each year.

These are some Tags I made, representing the nine stars of Matariki. I hope the explanation above is helpful. We, here in New Zealand, celebrate the Maori New Year on July 14th, the day I am going to SENZ,  big craft show. There is a Tag challenge, where you make tags representing Matariki. I used an Altenew embossing folder (Mighty Waves 3D) on these tags to represent the sky as well as the waves (water). Matariki celebrates both these. We needed to make 5 - 10 tags, one which we are to wear so others who have made some can recognize us and we can swap tags.  We pin one to a board as we go into the craft show, and a winner will be chosen from those pinned on the board. So once we have swapped our 8 tags with others, we will have 8 new tags.  I'm hopeless at explaining things so my apoloies if you are confused! Please feel free to ask me questions! My tags have the nine Matariki stars on, placed loosely in the formation they appear in the sky. Matariki is all about colour as well!


The tag above is the one I will be wearing, and keeping. I used a stencil with 3Dembossing pasted over top, and when it was dry I splattered on some Dinkles to add colour. I really like how the tag turn out.
Thelast lot of tags used the Mighty Wave embossing folder, and I swiped the tag with a Brilliance Gold stamp pad. I like how they turned out.
I will have photo's of the craft how to post here, and photos of the tags I swapped. I'm not in it to win it, just to have fun and see what my imagination could come up with for Matariki. (Pronounced Muh-ta-ree-kee)
Thanks for dropping by! Have a SUNSHINE day! Remember to always be your authentic self, and shine bright each and every day!

Sorry, I can't get rid of that red square, or the bit at the top f the post, grrrrr!!

Saturday 1 July 2023

Yay! I (Finally) Used My Dinkles!

The card above has "Jalandhar" stamped on. He is one of my Lavinia Stamps, and measures about 6 x2 inches, so he is quite a big stamp. I used my stamp platform to stamp him, as it is much easier for me to get enough pressure to stamp him properly. He is very sparkly, which isn't showing too well on here. I also used one of the Spanish Moss Foliage stamps on the bottom and sides. 
What are "Dinkles" I hear you ask?? Well they are a new range of very vibrant powders that react with water, also from Lavinia Stamps. These are what I made the coloured background with. There are 20 yummy colours, and they come as a powder which you sprinkle on your card, then spritz with water. or you can spritz your card first, and then sprinkle on the powders. You only need a VERY TINY bit of the Dinkles powder as the colours are really intense and go a long way. They also work well on Yupo paper. You can check them out either on you tube or by going to Lavinia Stamps and looking at their videos. I've had my Dinkles for few weeks, but having been so unwell, and then ending up in hospital, I have only just had a chance to try them out. I used some Mixed Media card stock as it takes the water really well without warping the card. For a first effort with them, I am very happy how this cad turned out!
These next two cads are a couple of the ones I posted earlier. I have backed them onto folded card stock ready to use for Christmas. 

These last three photos are of some cats I made, which I will make into cards. I just need to attach them to some folded cardstock. Very cue and fun to make!


 Thanks for dropping by, have a SUNSHINE day! Remember to always be your authentic self, and shine bright each and every day!