Total Pageviews

Sunday, 6 October 2019

If I Had A Star...

The words on the card below, are a stamp I got recently from Quietfire Designs. They have some lovely stamps, dies etc.
 To make the background I spritzed a sheet of white card with water, then using a brush (see last photo) I dropped a couple of drop of a Stampin' Up! re-inker in Turquoise onto the brush and then just carefully swooshed it across the white card. These brushes are super soft and blend the inks well. I also used some SU Lilac re-inker drops to blend in a bit of colour.  Once the card was dry, I added some drops of SU Shimmer paint (Frost) over the card.  These took longer to dry, I had to leave the card over night until it was dry.
 I die cut a circle of the water coloured card and stamped the words on using a Versafine black stamp pad.  I cut another circle out of thicker card and stuck the two together.  I adhered it to the card using some sponge tape to give it some dimension.  The hand was part of a stamp I had and had used it once. The stamp originally had two hands on it.  I decided to take the stamp off the wooden block and cut off the stamp I wanted to use.  I used my Tim Holtz Stamp Platform to stamp the hand.
After colouring the hand using my Copics, I carefully glued it to the card, and then began arranging the stars.  I adhered the water coloured card to a piece of dark blue card, then finally on to a folded white card. Below are the set of brushes I used to swoosh the re-inkers across the white card.  These are absurdly expensive here, in the craft stores, so I bought mine (a set of ten) from AliExpress for around $15 NZD.  FREE postage!!  I refuse to pay the asking price in craft stores, it's daylight robbery and totally disgusting to be ripping people off like that.  A few months back I did purchase ONE of these makeup brushes (a larger one) from a retail shop here, it was in the makeup department and cost me twice what ten brushes cost me!  I use it to apply my foundation - when I can be bothered wearing it! In all honesty, it does make applying your foundation super quick and it gives good coverage.  Just saying!
Ok, so that's it for today, so far!  Thank you for dropping by!  Have a SUNSHINE day!  {HUGS}from me to YOU:-) 

Tuesday, 1 October 2019

While I was at my local K.Mart recently, I saw this 3 tier vegetable container.  My (crafty) brain immediately said, "You could put your Stampin' Up! stamp sets in there!."  So I bought it! 
It's very light and was easy to put together - done in a minute!  Above is the bottom tier, and below is the middle tier. 
Below is the top tier which, at the moment, has my embossing folders in. I hang my spray bottle of water on the middle tier so it is easy to reach.  I came home and apologized to my vegetables..the potatoes, the pumpkin...etc!  
By having some of my craft things in this, it gives me more room on my desk and it is easy to access, and to see things.
Below is the(sadly empty!) bag that had some very yummy and delish candies in that Andrea sent me!  They were soooooo nice!  We have something similar here, and they are called, "Alligators!"  Very similar taste to the Swedish Fish! Thank you Andrea!!

Ok, that's all for now, thanks for dropping by!  Have a SUNSHINE day!  {HUGS} from me to YOU:-)

Monday, 30 September 2019

Beautiful Peacock Card!


 I made this Peacock card using a stamp set I got recently, form Andrea.  I love the simplicity and elegance of the stamp set.  I also like that I can stamp each stamp in a colour and that means I don't have to sit there and colour everything in.  I'm not big on colouring in at the moment!
Above is the Stampin' Up! stamp set I used.  Thank you Andrea!  Of course, you can use the flourish stamps for other things rather than a Peacock.  I am sure I will try that out soon!
Above is a Christmas card I made, als using a Stampin' Up! stamp (mug) and die.  I haven't used the is stamp/die set for ages, so it was fun to dust it off and make a card with the mug stamp/die!  I stuck the "Believe" onto the card using some stuff Andrea gave me.  It's sheets of sticky stuff and you just rub your die cut on it and then carefully lift the die cut off the sticky sheet and then  you can put it on your card.  Easy peasy and NO sticky bits on your card, and no fiddling around trying to get ultra tiny drops of glue onto you die cut.  Love it!
Ok, that's all for now.  Thanks for dropping by, have a SUNSHINE day!  {HUGS} from me to YOU:-) 

Sunday, 29 September 2019

Mini Post-It-Note Holder

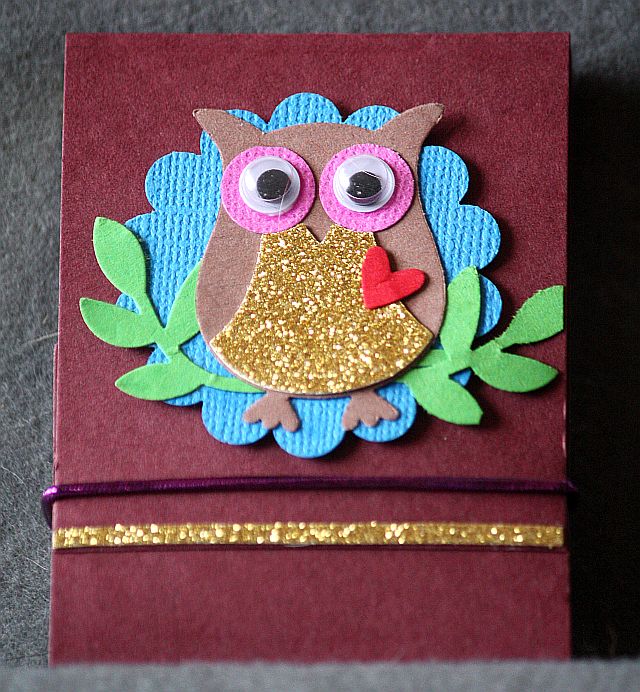
I made this little post-it-note holder today.  I punched out the Owl using a Stampin' Up! punch and added him to the front.  The note holder closes with the pink/purple elastic.  Lot's of fun to make! Below is the note holder closed.
 The photo below shows the note holder open.  It measures 2 3/4 inches tall by 2 inches wide.  Great way to use up your scrap pieces of card!
Thanks for dropping by, have a SUNSHINE day!  {HUGS} from me to YOU:-) 

Saturday, 28 September 2019

New Card!

Here is the first card I have made using some of the things Andrea sent me yesterday!  Below are the Stampin' Up! Textured Impressions Embossing folder and the SU It-Adorning Accents die I used.   
The embossing folder and die gives the card a nice fancy edge, instead of just being straight.
Thanks for dropping by, have a SUNSHINE day!  {HUGS} from me to YOU:-) 

Friday, 27 September 2019

Box of Goodies!

 Here are some photo's of what was in a box of goodies I received in the mail this morning!  
Above and below are some Stampin' Up! stamps and matching dies.  


 Above and below are cat and dog stamp sets..

Embossing folder and some paper clips... 
Some interesting window frame dies...
 Below is a Spellbinders die set...
 Below are two sets of border dies from Stampin' Up!...
Below is a cute flower die that cuts as well as embosses...
A bag of pretty assorted ribbon... 
A cute stamp set, below, with lots of fun stamps...
Two awesome embossing folders, below... 

A fun stamp set, below... 
Some fun embossing edges/folders from Stampin' Up!, below... 
Tea cup die, below... 
Some fun fish shaped brads, below...
 Two packs of self adhesive Magic Mesh...
 Below is two jars of fun flock...
 Some gorjuss green and red glitter, perfect to add to my Christmas cards!...
 Below are some of fancy shaped paper clips...
Some Swedish Fish candies...yumm...
Glass (flat bottom) embellishments...

Above is a pack of adhesive sheets to help me adhere my die cuts easily!... 
Above is another pretty embossing folder...
And below is a gorjuss card she made me!
Wow!!  I was totally blown away when I opened this earlier today.  All of this is from Andrea, a blogging friend in Minnesota USA.  She had emailed me a couple of weeks ago, ad asked if she could send me a box of craft goodies that hadn't sold at her recent yard sale.  She then sent me another email itemizing the things she was going to send me, to make sure I didn't already have them in my craft stash.
Then she posted the box to me and it arrived this morning!!  It's all spread out all over my art desk right now, and I have been oohing and ahhing over everything and just dabbling with things.  I haven't actually made a card yet.  A HUGE thank you to Andrea for being such a kind and generous person 💖  I am still smiling and have been for the last four plus hours!!  Please check Andreas blog, just click o her name and it will take you to her blog.
Ok, that's me for today...got to go and 'play' with my new toys!  Thanks for dropping by, have a SUNSHINE DAY!!  {hugs}from me to YOU:-)