Total Pageviews

Sunday, 31 May 2020

Gel Press Card

Above and below are my first attempt at using a circle shaped Gel Press!  I had been watching a You Tube video of someone using them, and was instantly hooked!  I chose to buy a circle shape instead of the oblong/square one.  The Gel Press measures just over 3 1/2 inches in diameter. The completed card measures 5 1/2 inches by 5 3/4 inches, so it is bigger than the normal size cards I make. I used a stencil I had, to get the wavy shapes, and  some black acrylic paint.  Below is a partial close up of the finished card.
The strip of words are from a Taylored Expressions stamp/die set.  The orange flower was die cut using some dies I have.  So far this is the only actual card I have made using the Gel Press.  I have lot's of impressions I have done, but nothing else made into a card, as yet.  The Gel Press is SO much fun to use, and I can use paints, inks, powders etc to get the impressions.  I am using cheap ($2) acrylic paints I get from my local $2 Shop.  I can mix the colours and add Mica powders to get different effects and colours.  It's messy and FUN!
Ok, that's it for now, thanks for dropping by!  Have a SUNSHNE day!  {HUGS} from me to YOU:-)

Thursday, 7 May 2020

Mr. Bear and Romeo-Valentino!

 I made this bear card this morning. I used various sized oval dies for the entire bear. (I had no pattern so I just made it up as I went along.)  I lightly sponged Tip Top Taupe SU ink around his paws, ears, nose and head.  I used a white gel pen for the dotted white lines as well as his eyes.  I lightly sponged white Hero Arts ink on his cheeks and ears.  I lastly added a small bow on one of his ears.  The words are from Taylored Expressions.
I think he is so cute!
Above is a photo of Romeo-Valentino!  He sleeps on his climbing tree, in the sun,which has about 6 platforms in different heights. Underneath him, sitting on the window ledge, is Big Ted.  When Romeo falls asleep, his head falls off the platform and rests on Big Teds head!  I think he is using Big Ted's head as a nice soft cushion! And why not!
Thanks for dropping by, have a SUNSHINE day!  {HUGS} from me to YOU:-)

Monday, 4 May 2020

Giraffe Circle Card

I made this circle card yesterday.  All the bits were sitting on my desk, so I just put them together to make the card. The only thing I had to die cut were the leaves. The card opens from the top. 
Just a quick post for now, may be more later!
Thanks for dropping by, have a SUNSHINE day! {HUGS} from me to YOU:-)

Saturday, 2 May 2020

Saturdays Cards!

On each of these cards I have used some of the Taylored Expressions strip stamps I just got.  The card above was water coloured with ink refills, and then I embossed it with a star embossing folder.  It's toilet paper! 😁
All of these cards were mostly already made, I just added the sentiments.  Sometimes I just make the card fronts without finishing them, so I often have these sitting on my desk ready to go.
I added some pale blue sequins to the above card, I didn't need much to finish it.  It's a bit of a cloudy/rainy day here today, so I was happy to be inside crafting!  It was a good 'crafternoon'!
Thank you for dropping by, stay safe and have a SUNSHINE day!  {HUGS} from me to YOU:-)

Words, Words and More Words!


My order of Taylored Expressions arrived yesterday, and I have been having loads of FUN with them!  Below is the "Simple Strips" stamp set.  It has lot's of words for general occasions.
This photo (below) is what the stamp looks like.  All the words are printed on a sheet, they aren't single stamps.  Each stamp set comes as one stamp, and this makes it SO easy to stamp and die cut all in one go!  It almost felt like I was cheating!  
And here below is the matching die for those words above. 
 The photo below shows the stamped words.
 See those black squares on the side of the stamped words in the photo above?? They are there so you can align the die correctly. You can see below how I have matched the stamped squares with the squares on the die.
I use washi tape to hold my dies in place and in the photo below you can see how the die cuts out ALL of the sentiments at the SAME time!  No trying to cut straight lines with your cutter, let the die do it all for you! 
I spent some time yesterday stamping and cutting the sentiments, and have sorted them into categories/colours.  I also got two other stamp/die sets with different words.
 Below is the "Valentine" Mini Strips, and I have the matching die for those too.  They cut out exactly like the General Occasions dies do.

 These are some tiny cards I quickly put together yesterday.  The cards measure about 1 3/4 by 1/34 inches. They were sitting on my desk so I decided to use them.
This photo is a close up of the above cards. 
Below is the "Holiday" stamp set.  These stamps and dies are SO much fun to play with, and there's many ways to use them on cards. 
Thanks for dropping by!  Have a SUNSHINE day!  {HUGS} from me to YOU:-)


Monday, 27 April 2020

Cats Wearing Face Masks!

Th cat stamps & dies (above) are from Sizzix Tim Holtz.  I've had them for some time but have not used them much.  Anyhow, these cats have face masks on to protect them from the Covid 19 virus!  I searched my stamps for animals that would look good with the masks on & I came across the cats and decided they were just right!  I stamped the cats onto some card I had water coloured with pink & blue ink.  Then I die cut them and attached them to the black card using sponge tape.  I made the face masks using a small piece off a tissue and used dental floss for the ties.  I added some sequins and a gold border and the card was done.  So much fun making the masks!  I think the cats faces say it all!
 The "Hugs" card above was a really quick one.  I stamped the background using a large SU stamp and glued it to the pale apricot card.  I already had the word "Hugs" die cut so I added it to a piece of apricot card and stuck it to the bottom of the card.  I also added 2 thin strips of shiny gold card above and below the apricot panel.  I lastly added some brass coloured sequins.  
I recently die cut a stash of word dies so I have a pile of different ones to choose from wen making a card.  It saves time to have them already die cut and ready to use. I mostly die cut them from black card.
Thanks for dropping by, have a SUNSHINE day! {HUGS} from me to YOU:-)


Growing Birdseed and Pumpkins

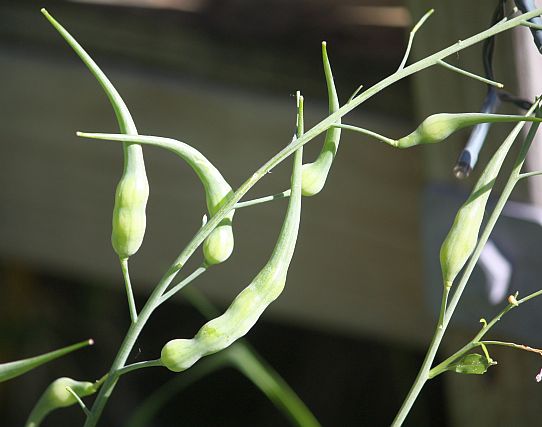
 Above is a photo of some flowering birdseed that has grown because the birds have dropped the seeds int the lawn.  There are now dozens of these plants growing wild.  Either in my lawn or in some of my pot plants.  I've left them there to grow and see what happens.  
Below are some of the many pods on the plants.  I opened one to see that was inside them.  It looked like beans to me.  I have no idea but I think maybe that is where the seeds will be?  Maybe they will dry and become seeds?  I have no idea!  It will be interesting to see what happens!
Below is another pumpkin that is growing nicely.  These were self seeded after I threw the pumpkin seeds into the garden.  This bit of garden is just for composting.  All the food peelings etc get thrown in here and it makes wonderful compost.  I have let the pumpkin spread across the lawn as there is plenty of room.
No cards today, just garden stuff!  Thanks for dropping by, have a SUNSHINE day!  {HUGS} from me to you:-)